
you can also read this article in Medium -> click here
Every developer has to face this at some point — implementing authentication for a full-stack project — frontend and backend.
You can also check my article Keycloak with Quarkus and Next.js/Auth.js: Full-Stack Authentication, which explains the same stack, but using Keycloak instead of Clerk as an authentication provider and identity management.
We’ll examine the process closely by building an application and securing it with Clerk—an authentication and user management system that handles user login, registration, and token-based security. We’ll focus on something very practical here — Clerk is widely adopted and people love using it for their SaaS products. It integrates seamlessly with Next.js, which is what we’re going to use for our frontend, and it’s extremely easy to set up (I mean, extremely easy).
So, like I already mentioned, we’ll use Next.js for our frontend and for the backend, we’ll use Quarkus. Next.js is particularly interesting when it comes to authentication, because it can mix server-side rendering (SSR) and client-side interactions, which can create some challenges when getting the user session data. Quarkus has become my go-to backend technology for building fast, scalable, and modern APIs. Together, they create a seamless flow: Clerk authenticates users and issues tokens, Quarkus validates those tokens and secures the API, and Next.js consumes the API while delivering a smooth sign-in user experience — ensuring your application is secure. Here is a diagram of how all three components play together:
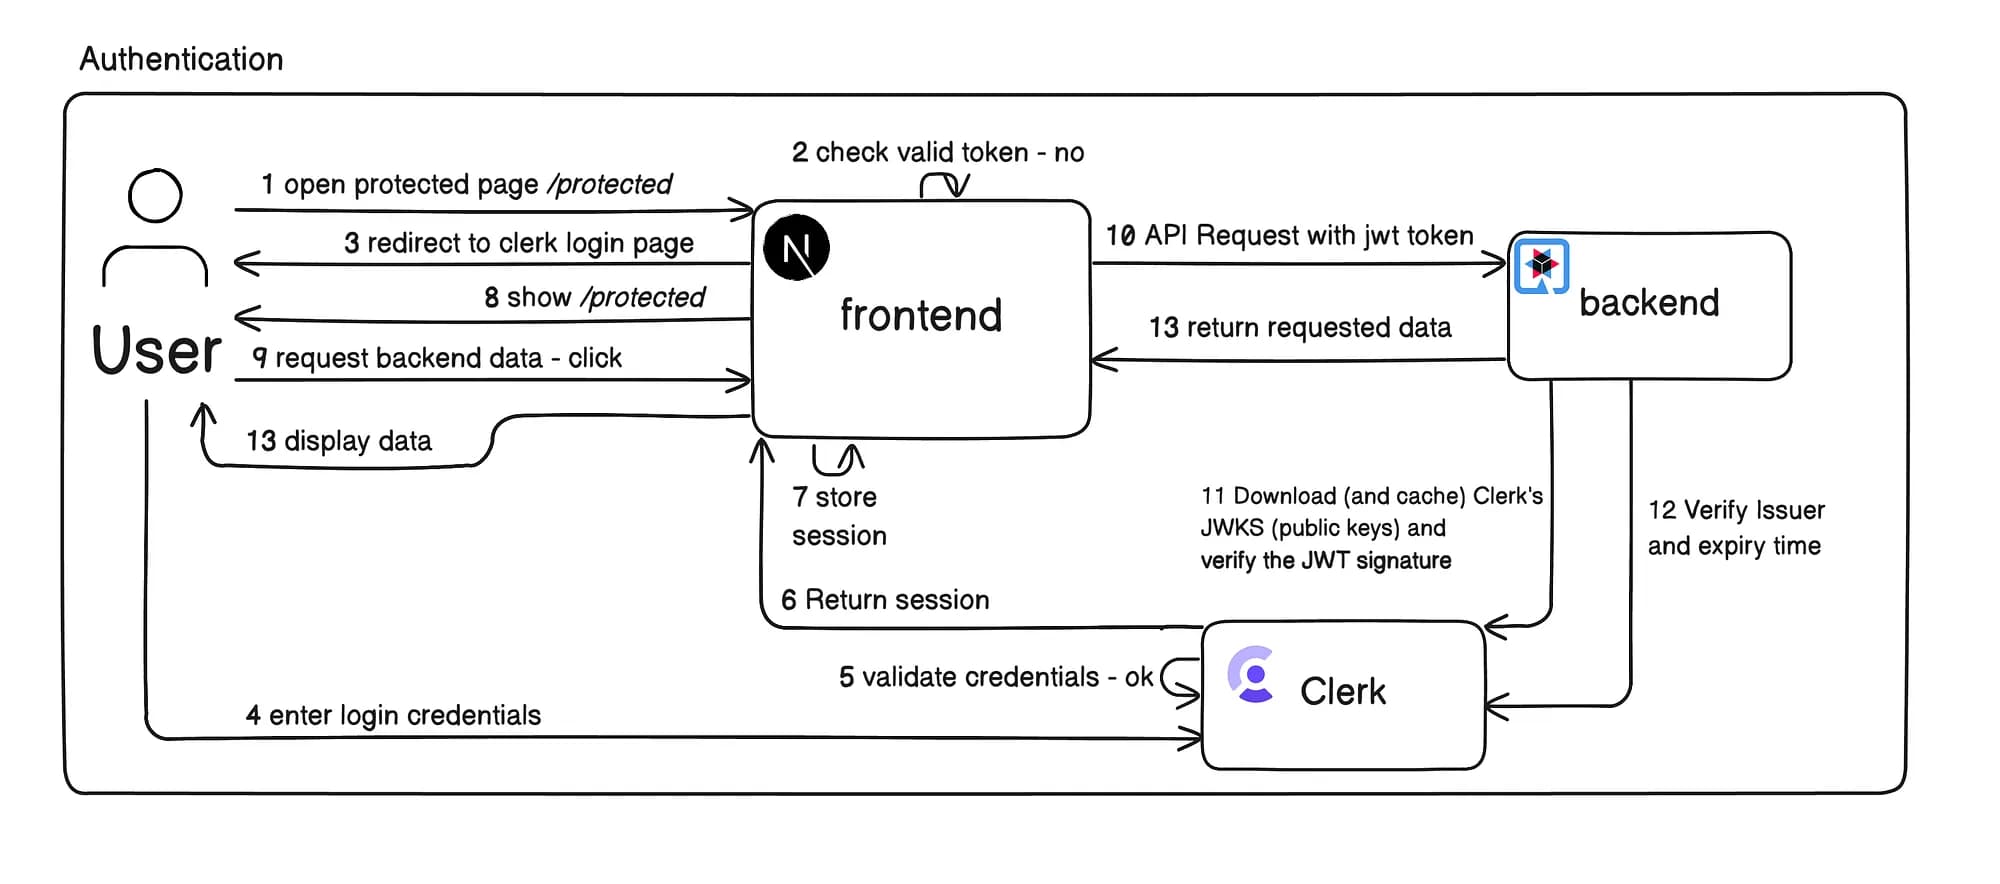
We’re going to look at all of those steps in detail (have in mind that this is a bit simplified). Let’s jump in, starting from the backend part.
1. Clerk Setup
We’ll start by creating an application in Clerk. Go to https://dashboard.clerk.com/apps/new and give your application a name, choose your SignIn Options, and click Create application:
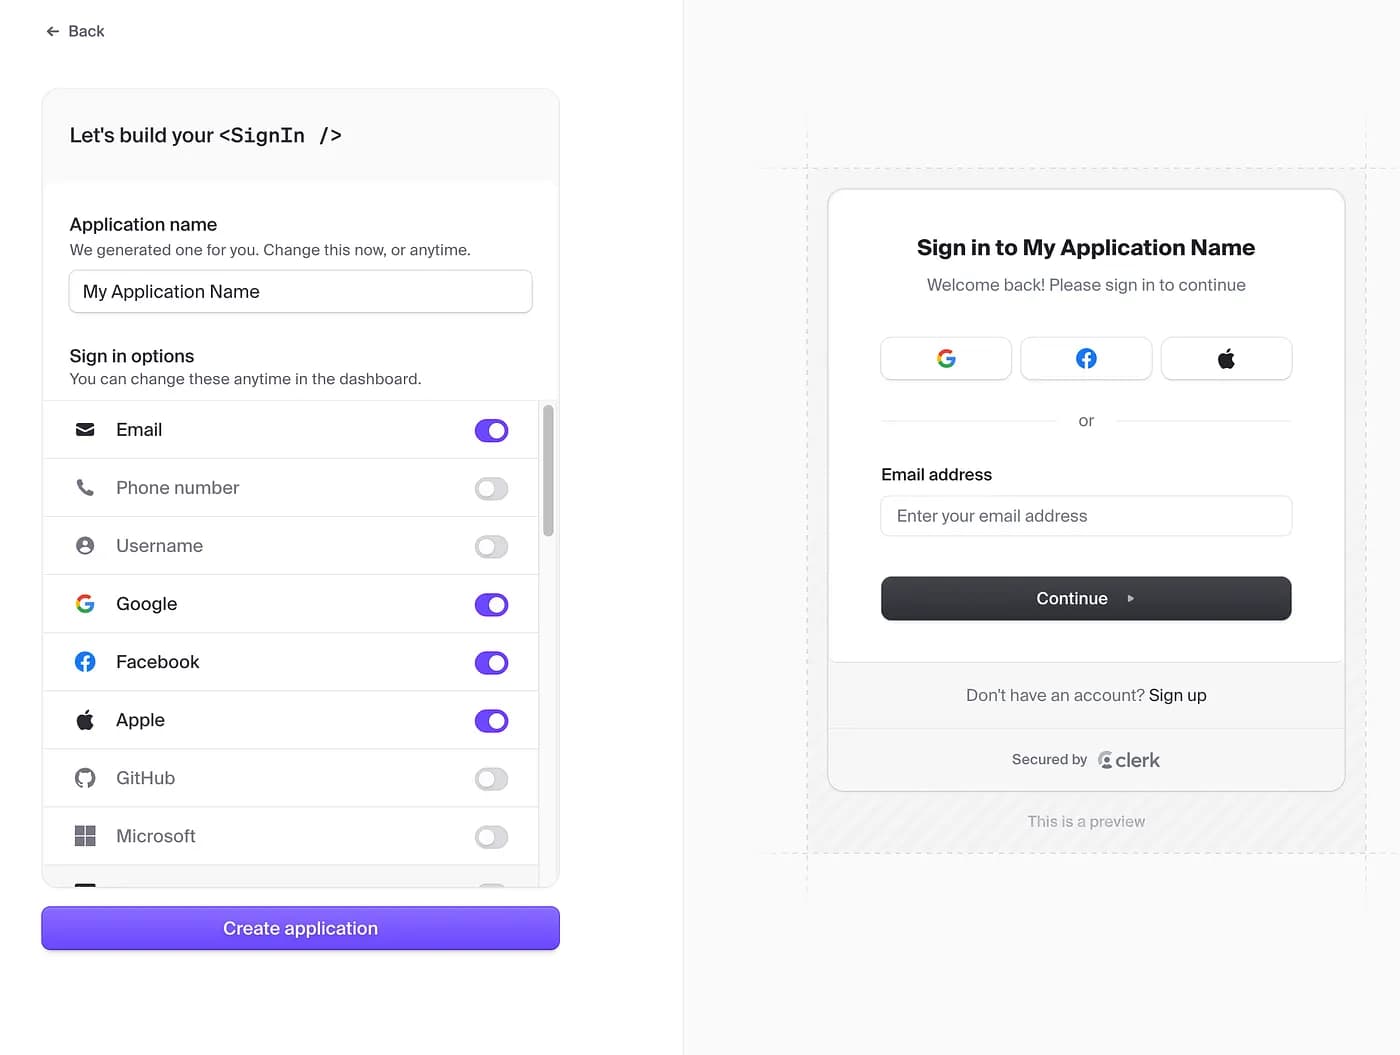
That’s it! You’ll be redirected to your Dashboard, where you can manage your users, sessions, API Keys, etc.
2. Create a simple Quarkus project
Go to code.quarkus dev and configure the following application
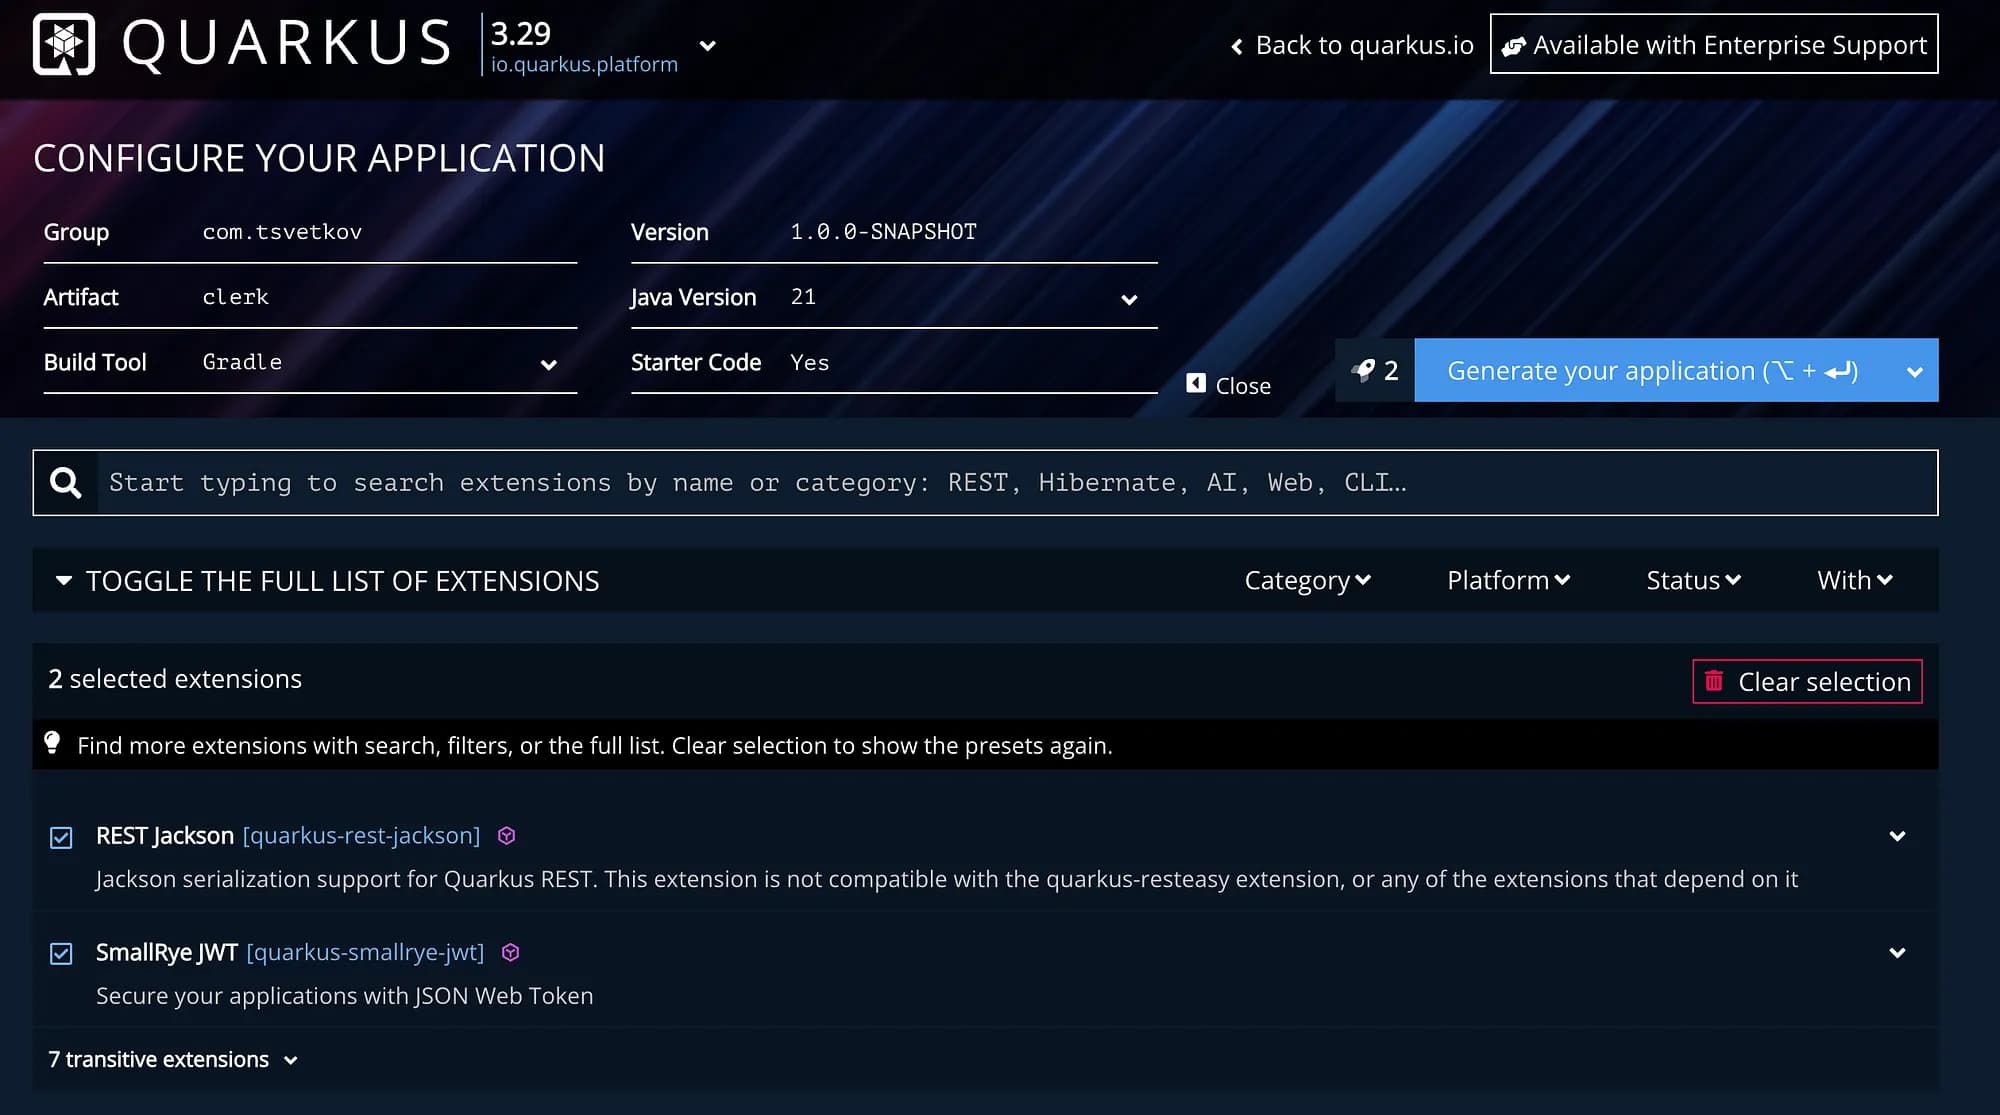
Just name the project as you wish, add the two extensions from above (REST Jackson and SmallRye JWT), and download it. Then you can open it in your favourite IDE (I use IntelliJ in all my examples).
3. Configuration — set application properties
Next, we’ll fill in our application properties needed to connect to Clerk. First, you need to go to your Clerk account and then:
Configure -> Developers/ API Keys:
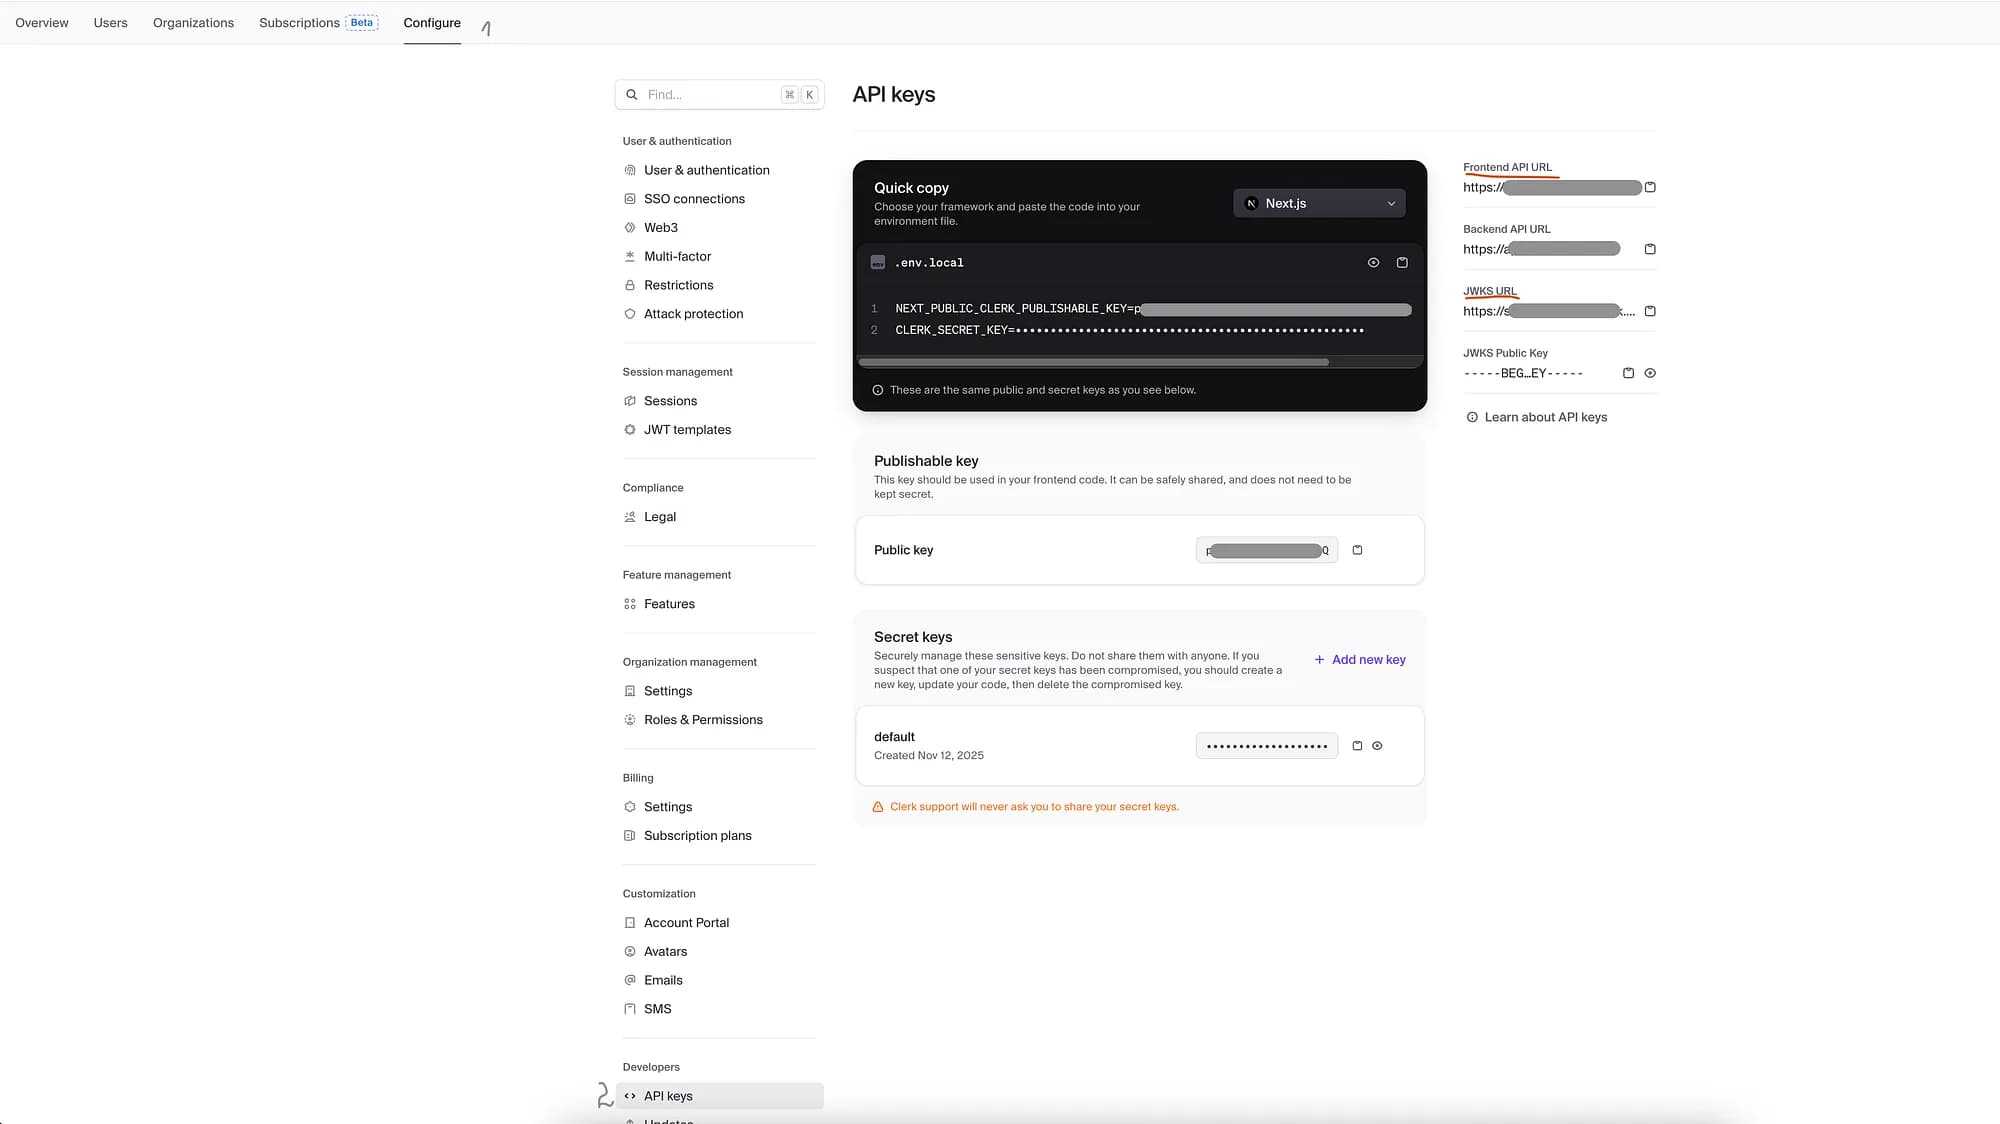
In application.properties , add the Frontend API URL and the JWKS URL:
mp.jwt.verify.issuer=Frontend API URL
mp.jwt.verify.publickey.location=JWKS URL
These properties are pretty self-explanatory — we define the issuer and the location of the public keys (JSON Web Key Set). Quarkus uses these to verify the token’s signature (the token itself is signed with a private key by Clerk).
Let’s also make all of our endpoints require authentication by default. Add this to application.properties :
quarkus.http.auth.permission.authenticated.paths=/*
quarkus.http.auth.permission.authenticated.policy=authenticated
4. Create a simple protected endpoint
Next, we’ll create a protected resource, so we can test our JWT authentication. Create the following endpoint:
import jakarta.ws.rs.GET;
import jakarta.ws.rs.Path;

@Path("/protected")
public class ProtectedResource {
    @GET
    public String getProtectedResource() {
        return "SOME PROTECTED VERY IMPORTANT DATA";
    }
}
Alright, now to the main part — let’s try to call it. You can use curl , Postman or any API Platform to test this:
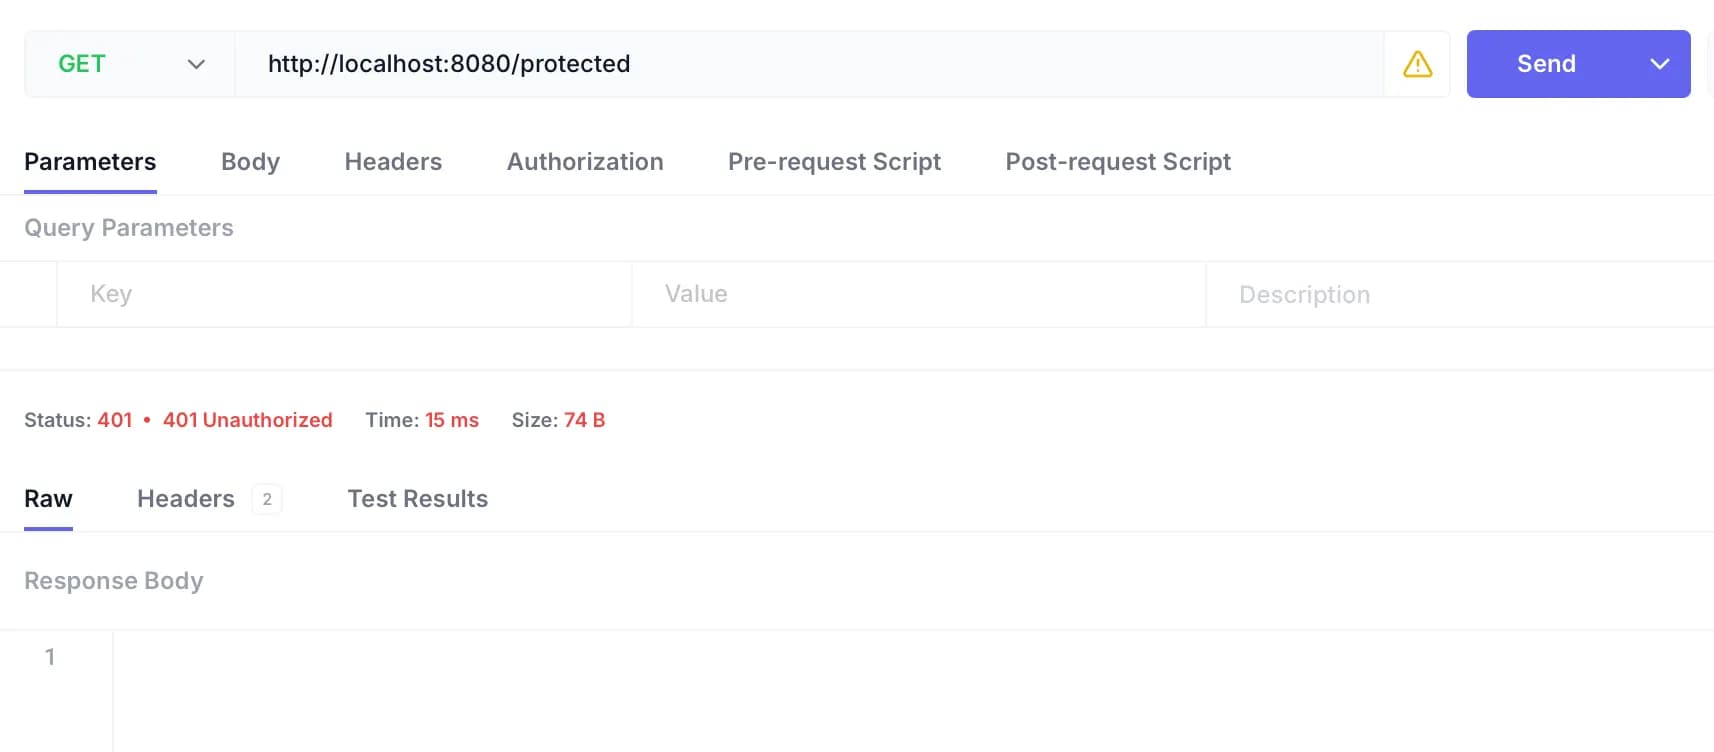
This should get you a HTTP/1.1 401 Unauthorized and that’s exactly what we expect, because we have protected all of our endpoints. In order to get the data from this endpoint, we need to pass a valid JWT Token. Usually, this will come from our frontend, but we’d like to test our backend right now.
5. Get a valid JWT token from Clerk for testing purposes
To get a valid token, we can use Clerk’s Backend API — this is the perfect way to play around a bit and really understand what’s going on. We first need to create a session, then use its session ID to generate a JSON Web Token (JWT) for this session.
So first, we need a user ID — this we can get from the Clerk’s Users Dashboard.
Then we need to send two requests — one to create a session for our user:
curl https://api.clerk.com/v1/sessions \
  --request POST \
  --header 'Content-Type: application/json' \
  --header 'Authorization: Bearer YOUR_SECRET_TOKEN' \
  --data '{
  "user_id": "",
}'
and one to create a token (using the session_id we got from the last request):
curl 'https://api.clerk.com/v1/sessions/{session_id}/tokens' \
 - request POST \
 - header 'Content-Type: application/json' \
 - header 'Authorization: Bearer YOUR_SECRET_TOKEN' \
 - data '{
 "expires_in_seconds": null
}'
You must replace YOUR_SECRET_TOKEN in the last two with your secret key, which you can find from your Clerk account under:
Configure -> Developers/ API Keys -> Secret keys
And that’s it — the response from the tokens request should contain a valid JWT token!
6. Test JWT Authentication
Now we need to just send our JWT token with a Bearer Token Header like this:
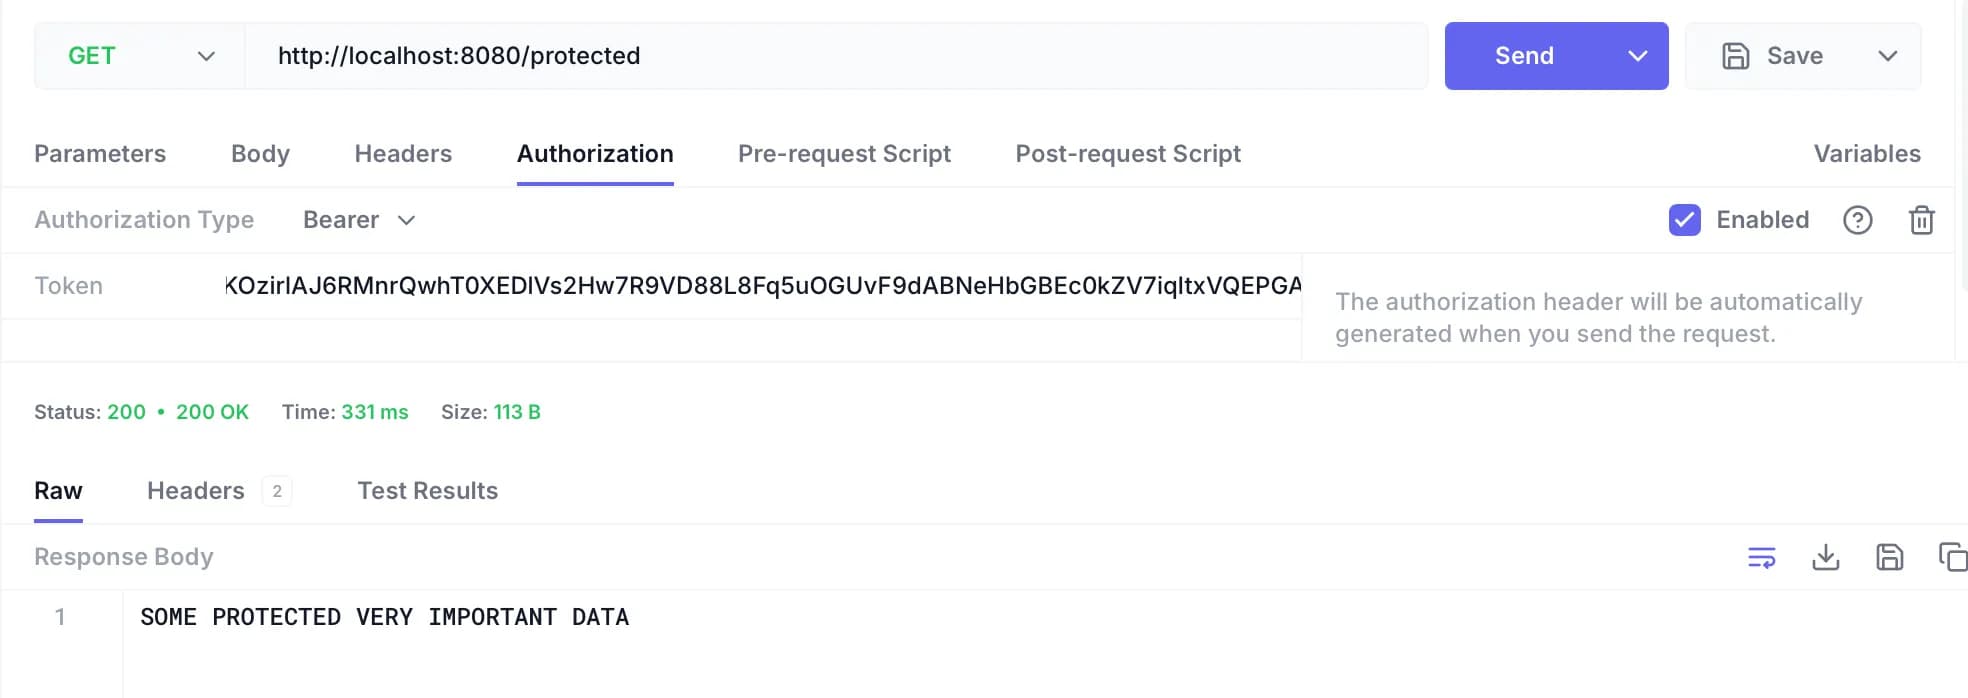
Now we’re able to get the data from our protected endpoint!
7. Role-based access
Let’s assume we want two types of users — normal ones and admins.
You can implement roles (like admin and user ) without paying for Clerk’s Pro/Enterprise plans or add-ons. Their free tier actually supports user metadata, which you can use for storing custom data like roles on user profiles.
Go to Clerk’s Dashboard -> Configure -> Session Management/Sessions
And in Customize session token, add this:
{
 "user_metadata": "{{user.public_metadata}}"
}
Save. Now every JWT includes user_metadata (e.g., { "role": "admin" }).
You can now go to Users in Clerk’s Dashboard and manually set which users you want to be admins. You can find this after you click on a user and add this to the public metadata:
{
  "role": "admin"
}
This is how it will look in your user’s profile under Metadata :
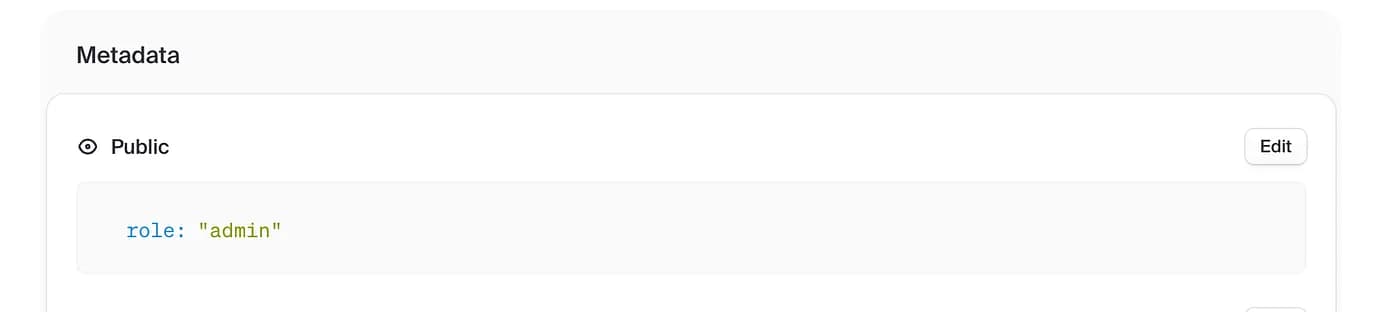
So now we have this custom claim that we can use to see who is an admin and who is not. This means that our JWT token contains:
{ "user_metadata": { "role": "admin" }
To make things clean and neat in our backend, we can use the SecurityIdentityAugmentor from Quarkus. It can be used to customize the SecurityIdentitywhich holds the principal, roles, credentials, which were used to authenticate the client (user) and other security attributes.
We can use @RolesAllowed in Quarkus with Clerk’s metadata roles which we can add through the logic in our SecurityIdentityAugmentor . Let’s have a look at how this works.
Create a new RoleAugmentor class and add the following:
import io.quarkus.security.identity.AuthenticationRequestContext;
import io.quarkus.security.identity.SecurityIdentity;
import io.quarkus.security.identity.SecurityIdentityAugmentor;
import io.quarkus.security.runtime.QuarkusSecurityIdentity;
import io.smallrye.mutiny.Uni;
import jakarta.enterprise.context.ApplicationScoped;
import jakarta.json.JsonString;
import org.eclipse.microprofile.jwt.JsonWebToken;

import java.util.Map;
import java.util.Optional;

@ApplicationScoped
public class RoleAugmentor implements SecurityIdentityAugmentor {

    @Override
    public Uni<SecurityIdentity> augment(SecurityIdentity identity, AuthenticationRequestContext context) {

        if (identity.isAnonymous()) {
            return Uni.createFrom().item(identity);
        }

        Optional<JsonWebToken> jwt = getJwtFromIdentity(identity);
        if(jwt.isEmpty()) {
            return Uni.createFrom().item(identity);
        }

        String role = extractRole(jwt.get());
            return context.runBlocking(()-> QuarkusSecurityIdentity.builder(identity)
                    .addRole(role)
                    .build());
    }

    private Optional<JsonWebToken> getJwtFromIdentity(SecurityIdentity securityIdentity) {
        return Optional.of(securityIdentity.getPrincipal())
                .filter(JsonWebToken.class::isInstance)
                .map(JsonWebToken.class::cast);
    }

    private String extractRole(JsonWebToken jwt) {
        Map<String, Object> metadata = jwt.getClaim("user_metadata");
        if (metadata == null || !metadata.containsKey("role")) {
            return "user";
        }

        Object roleObj = metadata.get("role");
        if (roleObj instanceof JsonString jsonString) {
            return jsonString.getString();
        } else if (roleObj instanceof String str) {
            return str;
        }

        return "user";
    }
}
Here we:
-
Get the JWT from the
SecurityIdentity -
Extract the role from our
user_metadata -
Build a new identity with the role that can be read from the
@RolesAllowedannotation in our endpoint.
Now all we need to do is add this @RolesAllowed annotation to our endpoint:
@Path("/protected")
public class ProtectedResource {
    @GET
    @RolesAllowed("admin")
    public String getProtectedResource() {
        return "SOME PROTECTED VERY IMPORTANT DATA";
    }
}
This endpoint can now only be called by admins!
Now that we have a backend that can verify Clerk tokens, let’s build a simple frontend, protect its routes, and get some protected data from the backend.
Let’s dive into the frontend (Next.js) part:
1. Create a simple Next.js App
Alright, now let’s create a Next.js Application and play around with our setup.
Go to your terminal and execute:
npx create-next-app@latestChoose a name for your project and then select “yes” on all the prompted questions.
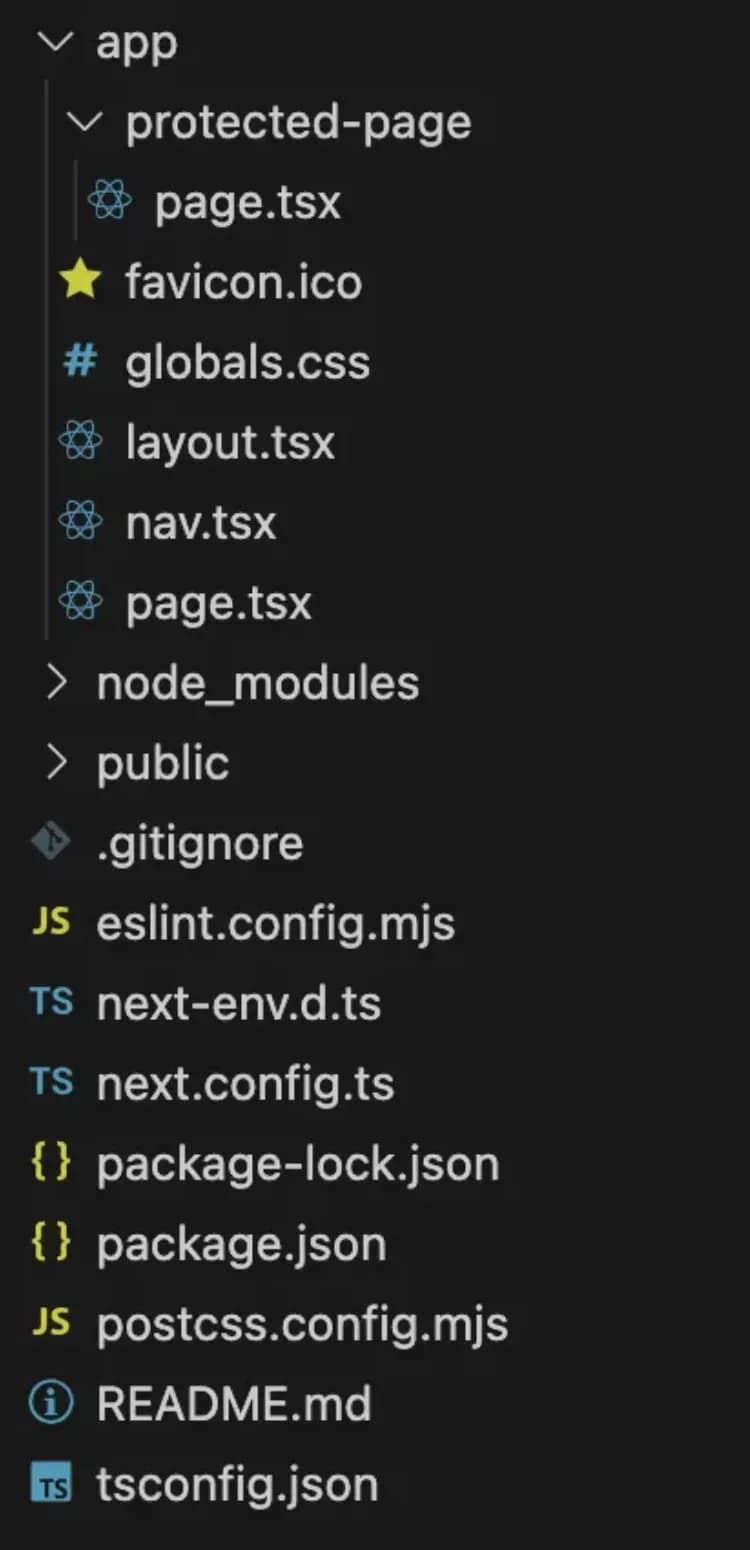
Then open the project in your favourite editor and create the following files:
app/nav.tsx and app/protected-page/page.tsx
your folder structure should look like this:
Let’s do things step by step and just write some minimal initial code for our application.
2. Initial code
Let’s start from our layout.tsx which should look like this in order for you to follow along:
import type { Metadata } from "next";
import { Geist, Geist_Mono } from "next/font/google";
import "./globals.css";
import Nav from "./nav";

const geistSans = Geist({
  variable: "--font-geist-sans",
  subsets: ["latin"],
});

const geistMono = Geist_Mono({
  variable: "--font-geist-mono",
  subsets: ["latin"],
});

export const metadata: Metadata = {
  title: "Create Next App",
  description: "Generated by create next app",
};

export default function RootLayout({
  children,
}: Readonly<{
  children: React.ReactNode;
}>) {
  return (

    <html lang="en">
      <body
        className={`${geistSans.variable} ${geistMono.variable} antialiased`}>
        <Nav />
        <main className="max-w-7xl mx-auto px-4 py-8">
          {children}
        </main>
      </body>
    </html>
  );
}
You notice that this file contains the Nav element from /app/nav.tsx so let’s code that next:
import Link from 'next/link'

function Nav() {
    return (
        <nav className="border-b border-gray-200 dark:border-gray-800">
            <div className="max-w-7xl mx-auto px-4 py-3">
                <div className="flex gap-6 text-sm">
                    <Link href="/" className="hover:opacity-70">
                        Home
                    </Link>
                    <Link href="/protected-page" className="hover:opacity-70">
                        Protected Page
                    </Link>
                </div>
            </div>
        </nav>)
}

export default Nav
The app/page.tsx component will be our public home page. We’ll keep things minimal too:
export default function Home() {
  return (
    <div>
      <h1 className="text-2xl font-medium mb-2">Home</h1>
      <p className="text-gray-600 dark:text-gray-400">Welcome to the home page.</p>
    </div>
  );
}
and lastly, our /protected-page/page.tsx which will set up a page that we want to secure with Clerk at http://localhost:3000/protected-page (Our navigation has a link to it too [see two code blocks above]):
function ProtectedPage() {
    return (
        <div>
            <h1 className="text-2xl font-medium mb-2">Protected Page</h1>
            <p className="text-gray-600 dark:text-gray-400">Welcome (Some User)! This is a protected page.</p>
        </div>
    )
}

export default ProtectedPage
Now go to your terminal, execute npm run dev and you should see this:
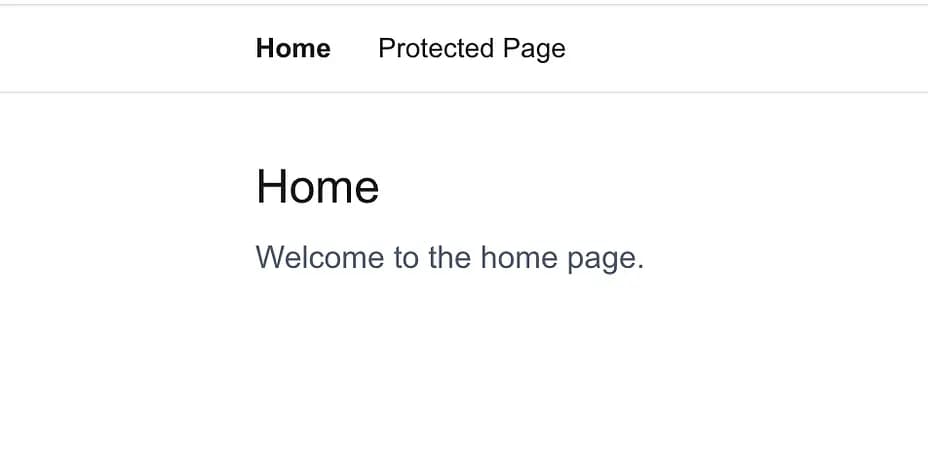
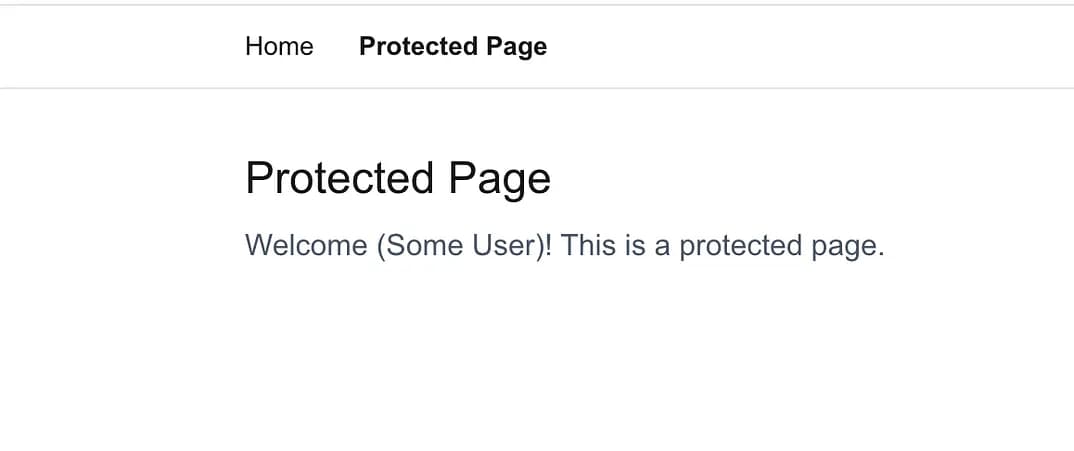
As you see, both pages are accessible, so it’s time to add some authentication! Only logged-in users should be able to access the protected page.
3. Add Clerk
Now it gets interesting — we will add Clerk to our project. Go to your terminal and execute:
npm install @clerk/nextjsThen, we’ll add clerkMiddleware() to our application.
If you’re using Next.js ≤15, name your file
middleware.tsinstead ofproxy.ts. The code itself remains the same; only the filename changes.
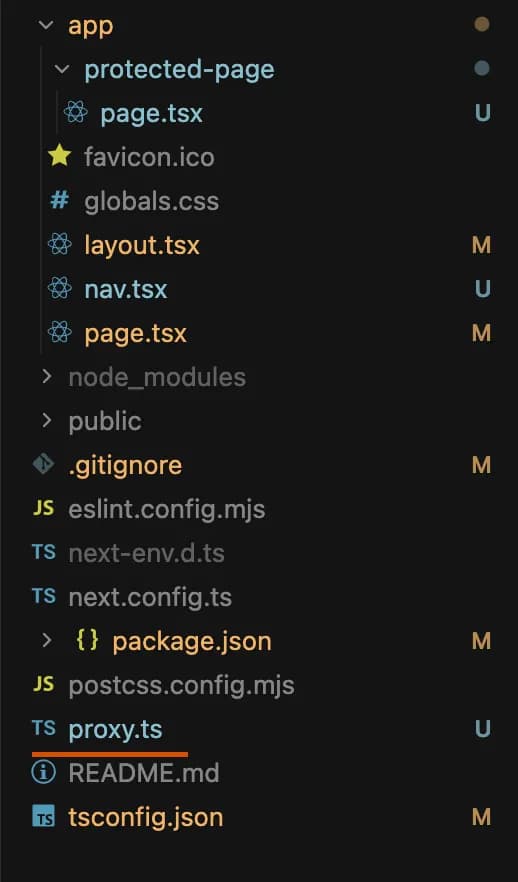
I’m using Next.js 16 so I’ll go and create a proxy.ts file in the root of my project. Here is how your folder structure should look:
And here the content of the proxy.ts file:
import { clerkMiddleware, createRouteMatcher } from '@clerk/nextjs/server'

const isPublicRoute = createRouteMatcher(['/'])

export default clerkMiddleware(async (auth, request) => {
    if (!isPublicRoute(request)) {
        await auth.protect()
    }
})

export const config = {
    matcher: [
        // Skip Next.js internals and all static files, unless found in search params
        '/((?!_next|[^?]*\\.(?:html?|css|js(?!on)|jpe?g|webp|png|gif|svg|ttf|woff2?|ico|csv|docx?|xlsx?|zip|webmanifest)).*)',
        // Always run for API routes
        '/(api|trpc)(.*)',
    ],
}
You see, we use this file to configure which routes we want to protect and which routes should be public. In our case, we set only one public route (the home route “/” ), everything else must be protected and require a logged-in user in order to be displayed.
By the way, this is nothing fancy here, we’re just following the Clerk’s documentation. All of this is really easy to set up and is very well documented.
Next, we need to wrap all of our application layout into a ClerkProvider . This will make Clerk’s authentication context available to all of our components. We’ll modify our layout.tsx slightly like this:
...

import { ClerkProvider } from "@clerk/nextjs";

...

export default function RootLayout({
  children,
}: Readonly<{
  children: React.ReactNode;
}>) {
  return (
    <ClerkProvider>
      <html lang="en">
        <body
          className={`${geistSans.variable} ${geistMono.variable} antialiased`}
        >
        ...
        </body>
      </html>
    </ClerkProvider>
  );
}
And that’s all we need to do to protect our private routes!
We just need to connect our application with the Clerk’s app instance we created in the beginning of this article. Go to your Clerk’s Dashboard, and then Configure -> Developers/ API Keys:
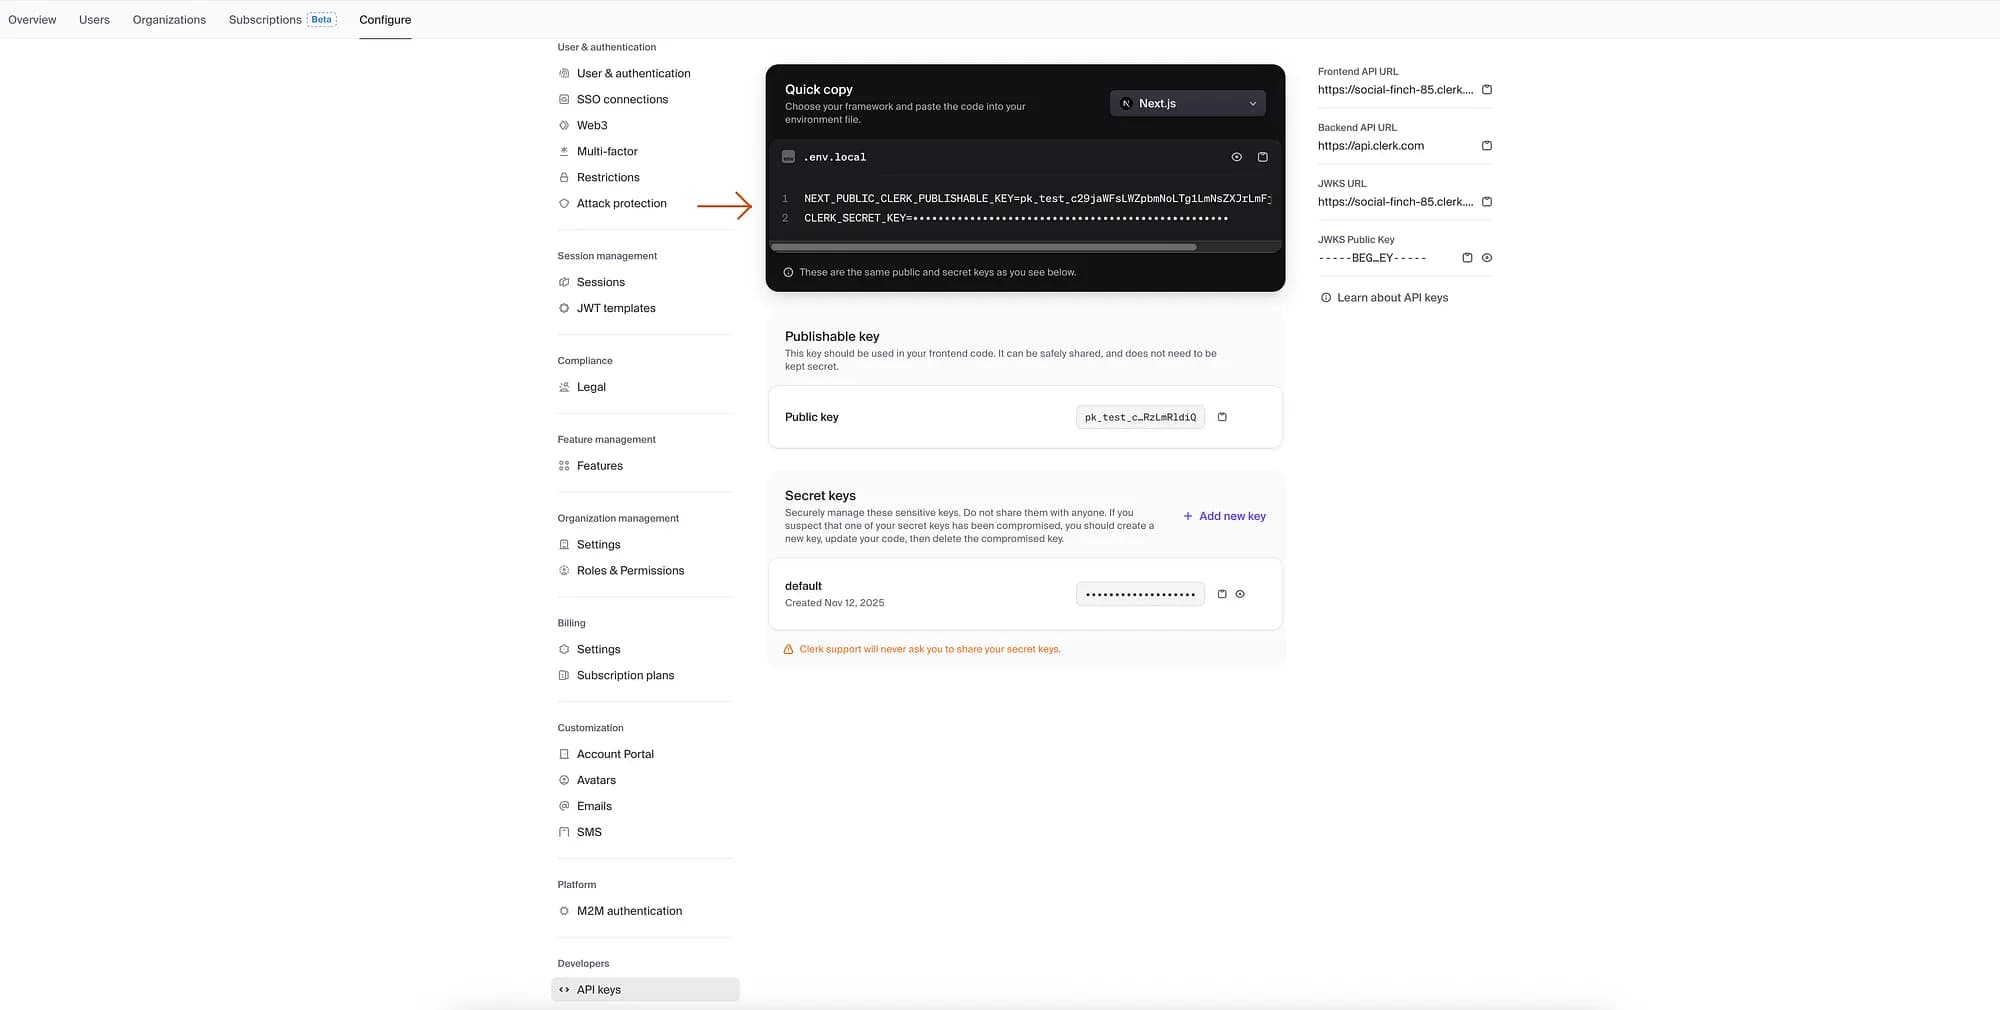
Here you’ll see the environment variables you need to set in your Next.js project in order to connect the application to your Clerk account.
Create an .env.local file in the root of your project and just paste the environment vars from the API keys there.
That’s it, now we have hooked up our Clerk account to our project!
Now go to http://localhost:3000 and you’ll see that the home page is still publicly accessible, but as soon as we navigate to our protected-page we see Clerks Sign-In page:
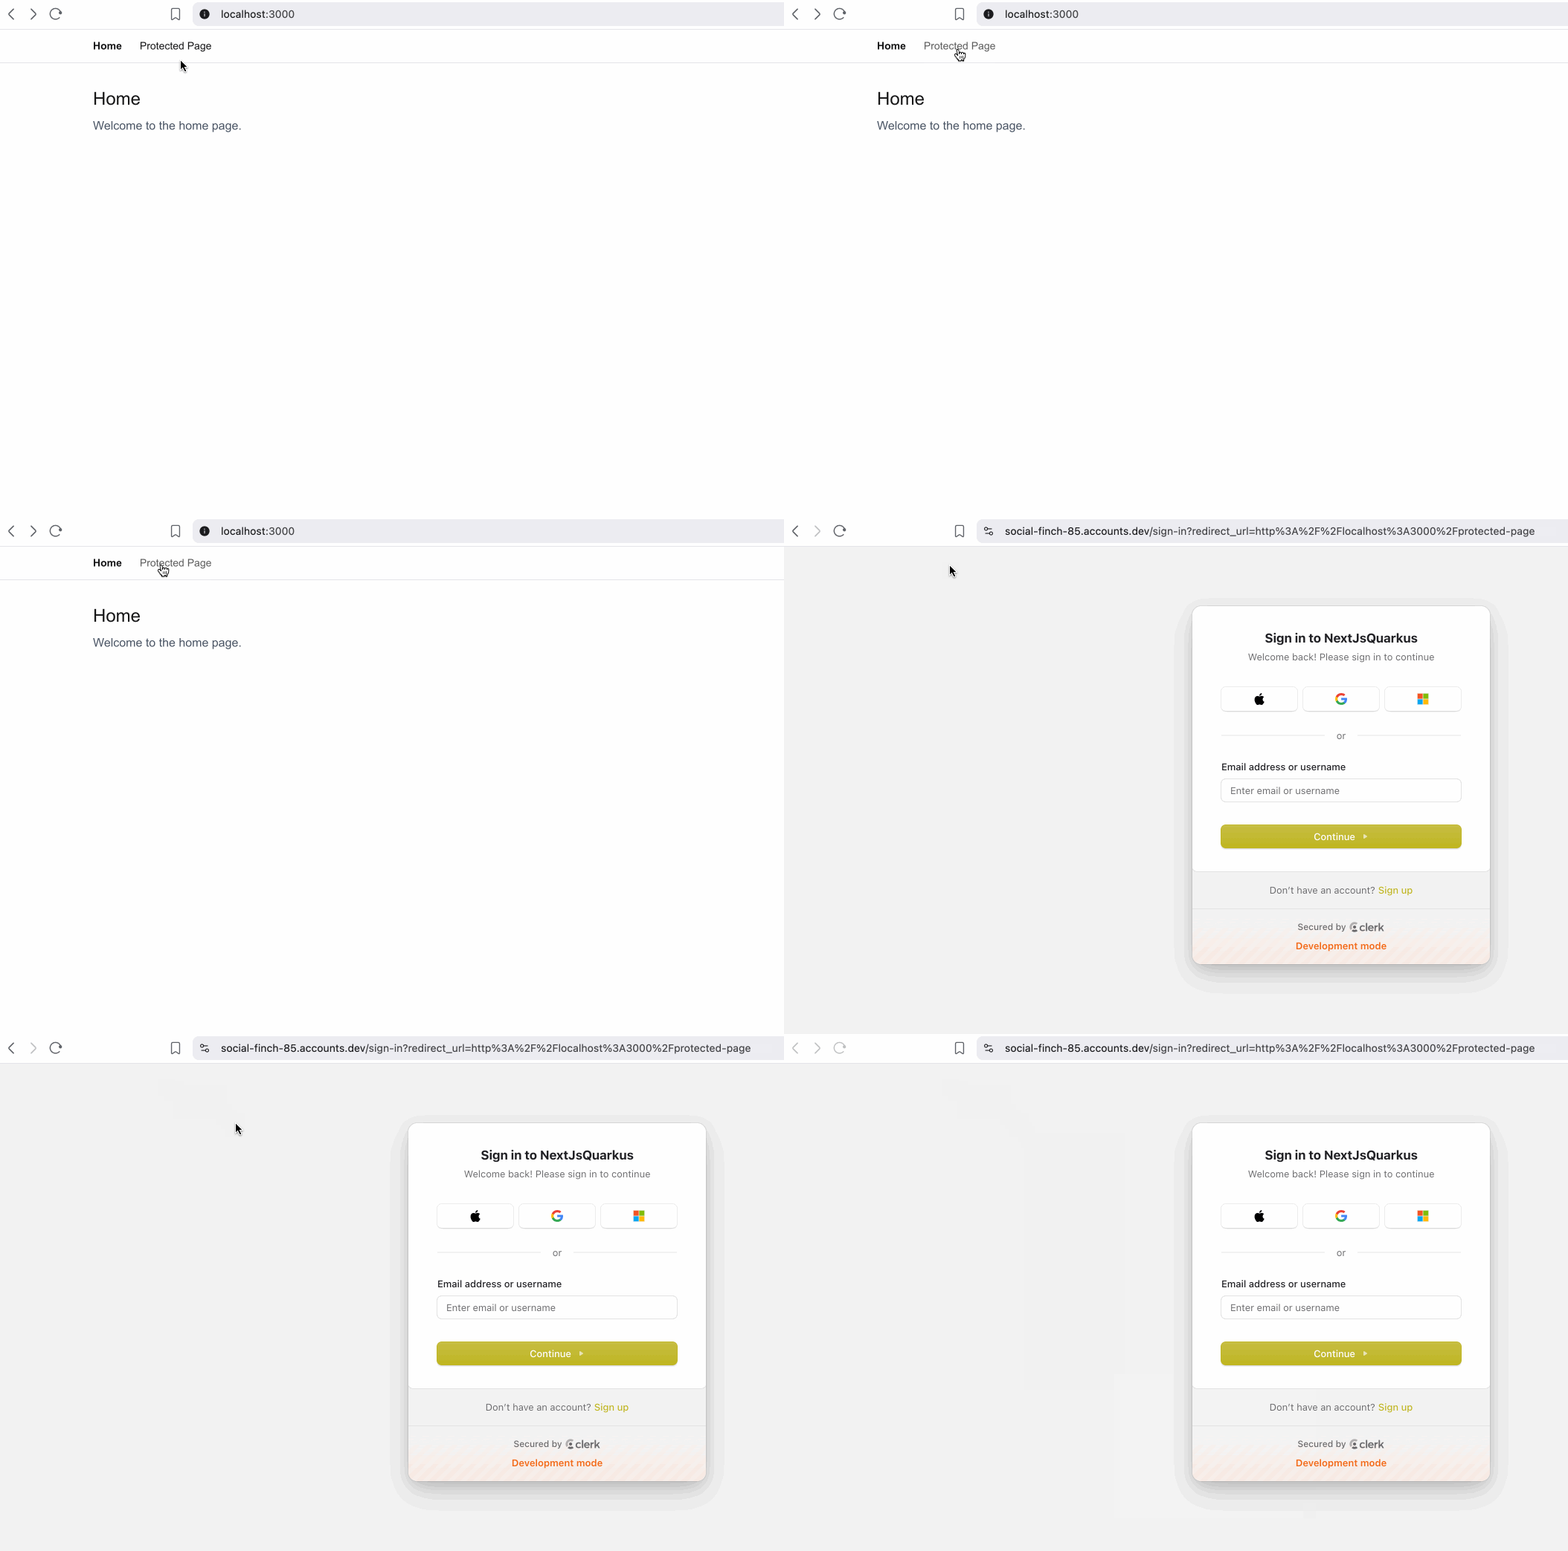
Now we can sign in (for example, with Google) and we’ll be able to see our protected-page route! Let’s even modify our page a bit to show some information about the user. Have in mind that our protected-page.tsx is a server component. (because we haven’t explicitly marked it with “use client” in the beginning of the file).
It cannot be easier to get the user’s information in our component after we’re logged in. We’ll simply use const user = await currentUser() , here the modified code in protected-page.tsx where we render the actual name of our user on our page:
import { currentUser } from "@clerk/nextjs/server"

async function ProtectedPage() {
    const user = await currentUser()

    return (
        <div>
            <h1 className="text-2xl font-medium mb-2">Protected Page</h1>
            <p className="text-gray-600 dark:text-gray-400">Welcome ({user?.firstName} {user?.lastName})! This is a protected page.</p>
        </div>
    )
}

export default ProtectedPage
Simple as that! We have access to all the user data from Clerk in the user object.
Now it’s time to get some data from our backend!
Remember to add
{
  "role": "admin"
}
to your user’s metadata, because we made our backend endpoint only accessible for admin users.
The next part is very easy. We just get the jwt token from Clerk’s convenience methods and call our backend with Bearer <jwt> header. We need to modify our protected-page.tsx yet again, to call our backend and render our response data:
import { auth, currentUser } from "@clerk/nextjs/server"

async function ProtectedPage() {
    const user = await currentUser()
    const { getToken } = await auth()
    const token = await getToken()

    const response = await fetch("http://localhost:8080/protected", {
        headers: {
            Authorization: `Bearer ${token ?? ""}`,
        },
    })
    const responseText = await response.text()

    return (
        <div>
            <h1 className="text-2xl font-medium mb-2">Protected Page</h1>
            <p className="text-gray-600 dark:text-gray-400">Welcome ({user?.firstName} {user?.lastName})! This is a protected page.</p>
            <p className="mt-4 font-mono text-sm wrap-break-word">Response Text: {responseText}</p>
        </div>
    )
}

export default ProtectedPage
That’s it! Now go to http://localhost:3000/protected-page and you should be able to see your user’s first and last name AND the data from our backend! Something like this:
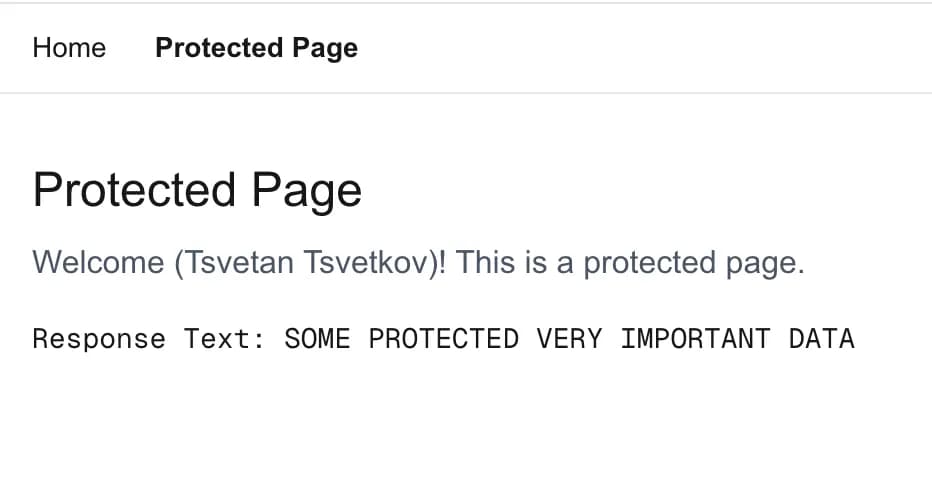
Let’s recap:
-
First, we created a Clerk account
-
Then we created a simple backend with Quarkus with one protected endpoint. In order to connect the backend with our Clerk account, we needed just two properties —
mp.jwt.verify.issuerandmp.jwt.verify.publickey.location. Our backend then uses the singlequarkus-smallrye-jwtdependency and these two properties to verify JWT signatures and check the issuer of the JWT Tokens. -
The next part was our Next.js frontend — We created a sample project with one protected page (
/protected-page). We then just needed to install the clerk dependency withnpm install @clerk/nextjs, add ourproxy.ts(ormiddleware.ts) file, and fill our environment variables in.env.localto hook up our Clerk account with our project. Next, we wrapped our whole layout with a<ClerkProvider>and that was it!
Conclusion
I love how easy it is to set up Clerk. You don’t care about hosting, no servers to manage, very simple SDKs (you just saw our Next.js setup), and you get a beautiful dashboard. If you compare this to using a self-hosted solution like Keycloak, you’ll see a huge difference (Again, you can check my article with the same stack but using Keycloak instead of Clerk here). Of course, Keycloak does give you way more control and has more features out of the box, completely for free.
It’s worth mentioning that Clerk offers its more advanced features only on its paid plan. However, its free plan is also very (very!) strong and generous! It includes up to 10,000 monthly active users, (a user is counted as active when they return to your app 24+ hours after signing up) which is more than enough for most small-to-medium apps and early-stage projects. And let’s be honest — if you haven’t found a way to monetize your application when you have more than 10,000 users monthly, the cost of Clerk isn’t your real problem.
Thanks for reading!