
you can also read this article in Medium -> click here
In this article, we'll have a look at a practical example of Integration Tests for uploading an image into S3 Bucket with the help of LocalStack and Testcontainers. Uploading an image to an S3 bucket is a very common task in real-life applications nowadays. Imagine - for example, your users need to add a profile picture, add some images in a blog article… or if you want to use Machine Learning to detect objects on the uploaded image then, do Instance Segmentation, or just some image processing using OpenCV - the first step of the way is always to be able to upload an image.
https://medium.com/itnext/quarkus-integration-tests-for-s3-bucket-with-localstack-and-testcontainers-55624720d1d7
Prerequisites:
You need to have docker, java, and a code editor (I use IntelliJ) installed on your machine to follow along 👍
Create a Quarkus Java Application
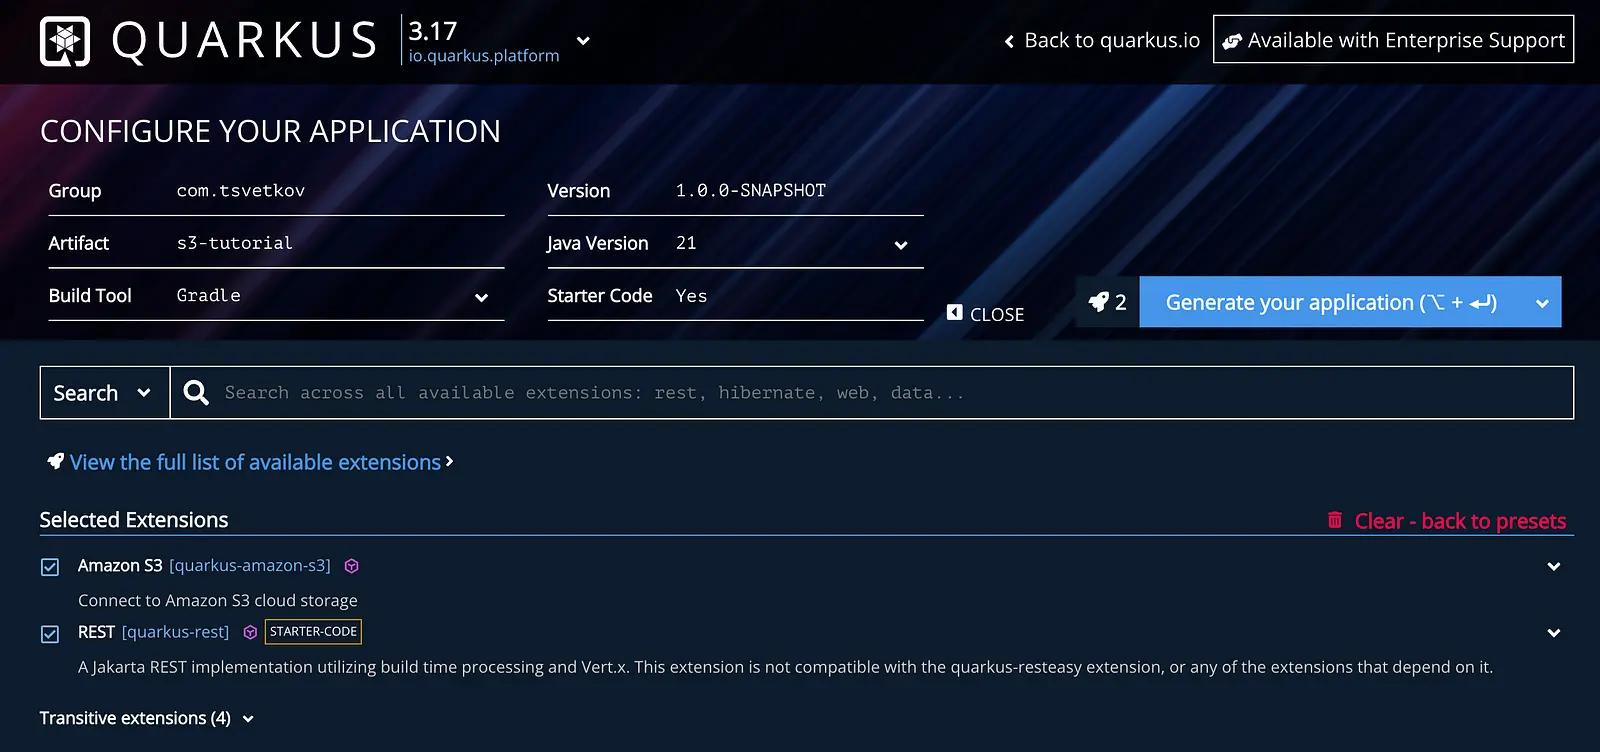
Let's start by creating a Quarkus Java Application for our example. Go to code.quarkus.dev:
- Name your project
- Choose Gradle as Build Tool (optional, if you want to follow along. Maven would of course also work)
- Preferably - Java 21
- Add the Amazon S3 and the Quarkus Rest dependencies (we'll add more later).
To showcase the testing with Testcontainers we first need some code. I'm thinking - let's create a minimal setup, that can still help us understand the most important parts:
- Create a REST Endpoint to upload an image
- Save the image in our S3 Bucket
- List all the images in the S3 Bucket
This should be enough to have something to test and to be able to debug our functionality along the way easily.
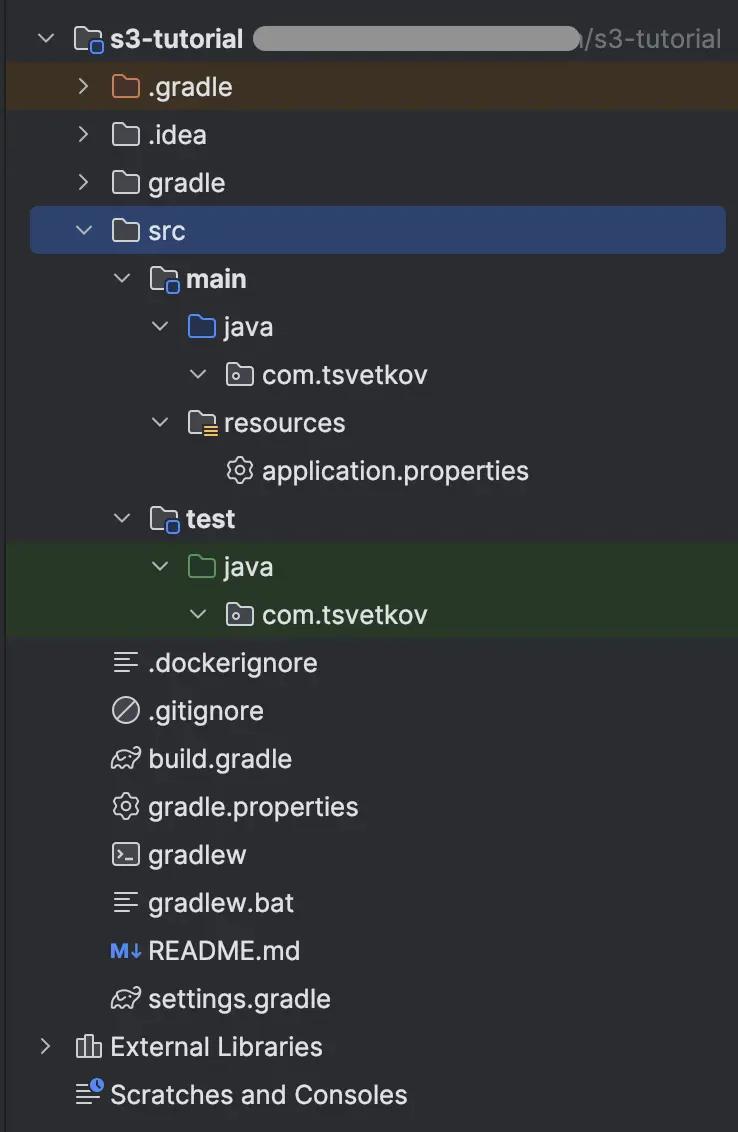
I'll start by cleaning up our project a bit, to keep things minimal - a couple of the pre-generated folders and
files from the Quarkus starter won't be needed for this tutorial - let's delete them so that they are not in the way.
I'm talking about the src/native-test, src/main/docker folders and the pre-generated Resources and Resource Tests in the main packages.
Our project structure should look like this (with your project name, of course):
AWS S3 Bucket Configuration
We need to add one more dependency to our project at this stage: the url-connection-client library
implementation 'software.amazon.awssdk:url-connection-client'Now go to /src/main/resources and add the following content to the application.properties file.
quarkus.s3.devservices.enabled=false
quarkus.s3.path-style-access=true
quarkus.s3.endpoint-override=http://localhost:4566
quarkus.s3.aws.region=us-west-1
bucket.name=s3-dev-bucket
Explanation:
devservices.enabled=false : we set this so that quarkus-amazon-s3 doesn't automatically start a LocalStack container in dev mode for us. We want to go about this with understanding, so we're going to set up LocalStack ourselves.
quarkus.s3.path-style-access: Enable using path style access for accessing S3 objects instead of DNS style access. (see docs for more details)
quarkus.s3.endpoint-override: the endpoint with which the AWS SDK should communicate.
The region and bucket name are self-explanatory. We only reference them here, but we're going to create them a bit later. It's worth mentioning here, that if we use LocalStack for local S3 Instance, the access key and secret access key are not required to be set. You'll need these if you run the application in production though.
Service for adding an image to the S3 Bucket
Let’s create a new package called service and add a service class (S3Service) there with two methods: uploadFileToS3 and listS3Objects.
The second one we’re going to use to verify that the image upload was successful:
package com.tsvetkov.service;

import jakarta.enterprise.context.ApplicationScoped;
import jakarta.inject.Inject;
import org.eclipse.microprofile.config.inject.ConfigProperty;
import org.jboss.logging.Logger;
import org.jboss.resteasy.reactive.multipart.FileUpload;
import software.amazon.awssdk.services.s3.S3Client;
import software.amazon.awssdk.services.s3.model.ListObjectsRequest;
import software.amazon.awssdk.services.s3.model.PutObjectRequest;
import software.amazon.awssdk.services.s3.model.PutObjectResponse;
import software.amazon.awssdk.services.s3.model.S3Object;

import java.util.List;
import java.util.UUID;

@ApplicationScoped
public class S3Service {
    private static final Logger LOG = Logger.getLogger(S3Service.class);

    @ConfigProperty(name = "bucket.name")
    private String bucketName;

    @Inject
    private S3Client s3;

    public PutObjectResponse uploadFileToS3(FileUpload file) {
        LOG.info("Saving image in s3 bucket...");

        return s3.putObject(PutObjectRequest.builder()
                        .bucket(bucketName)
                        .key(file.fileName()+"_"+ UUID.randomUUID())
                        .contentType(file.contentType())
                        .build(),
                file.uploadedFile());
    }

    public List<S3Object> listS3Objects() {
        return s3.listObjects(ListObjectsRequest.builder().bucket(bucketName).build()).contents();
    }
}
We’ll get to the FileUpload type in a second 👍
Create an Endpoint for uploading an image
Create a new UploadImageResourceand let’s add the following code inside:
package com.tsvetkov;

import com.tsvetkov.service.S3Service;
import jakarta.inject.Inject;
import jakarta.ws.rs.POST;
import jakarta.ws.rs.Path;
import jakarta.ws.rs.Produces;
import jakarta.ws.rs.core.MediaType;
import jakarta.ws.rs.core.Response;
import org.jboss.logging.Logger;
import org.jboss.resteasy.reactive.RestForm;
import org.jboss.resteasy.reactive.multipart.FileUpload;
import software.amazon.awssdk.services.s3.model.S3Object;

import java.util.List;
import java.util.stream.Collectors;

@Path("/upload")
public class UploadImageResource {
    private static final Logger LOG = Logger.getLogger(UploadImageResource.class);

    @Inject
    S3Service s3Service;

    @POST
    @Produces(MediaType.APPLICATION_JSON)
    public Response multipart(@RestForm("image") FileUpload file) {
        s3Service.uploadFileToS3(file);

        List<S3Object> s3BucketObjectsList =  s3Service.listS3Objects();

        List<String> objectNames = s3BucketObjectsList.stream()
                .map(S3Object::key)
                .toList();

        LOG.info(objectNames);
        return Response.ok(objectNames).build();
    }

}
Note the new way to handle Multipart Form data from Quarkus (see Quarkus documentation).
This new method is really an improvement over the @MultipartForm annotation, that is now deprecated:
To handle HTTP requests that have
multipart/form-dataas their content type, you can use the regular@RestFormannotation, but we have special types that allow you to access the parts as files or as entities.
So the code is pretty straight forward ->
- Upload Image File to S3
- List all the objects in the bucket, to verify that we have successfully added the file
Create S3 Bucket locally
Alright, now, before we start our application, we have to actually get LocalStack running and create an S3 bucket to which our application can connect.
The easiest way is to use awslocal which is LocalStack’s wrapper around the AWS CLI and it simplifies the setup a lot. So here are the steps:
-
Start a LocalStack docker container:
localstack start -d -
Connect to the container:
docker exec -it localstack_main bash -
Create the bucket with the LocalStack AWS CLI:
awslocal s3api create-bucket - bucket s3-dev-bucket - region eu-west-1 - create-bucket-configuration LocationConstraint=eu-west-1 -
Verify that the bucket was created:
awslocal s3api list-buckets
Run Quarkus App
Now, we can start our Quarkus application and check if everything works as expected. Just go to the terminal in the project folder and execute:
./gradlew quarkusDev
You can use Postman or any other API Platform to test our Endpoint:
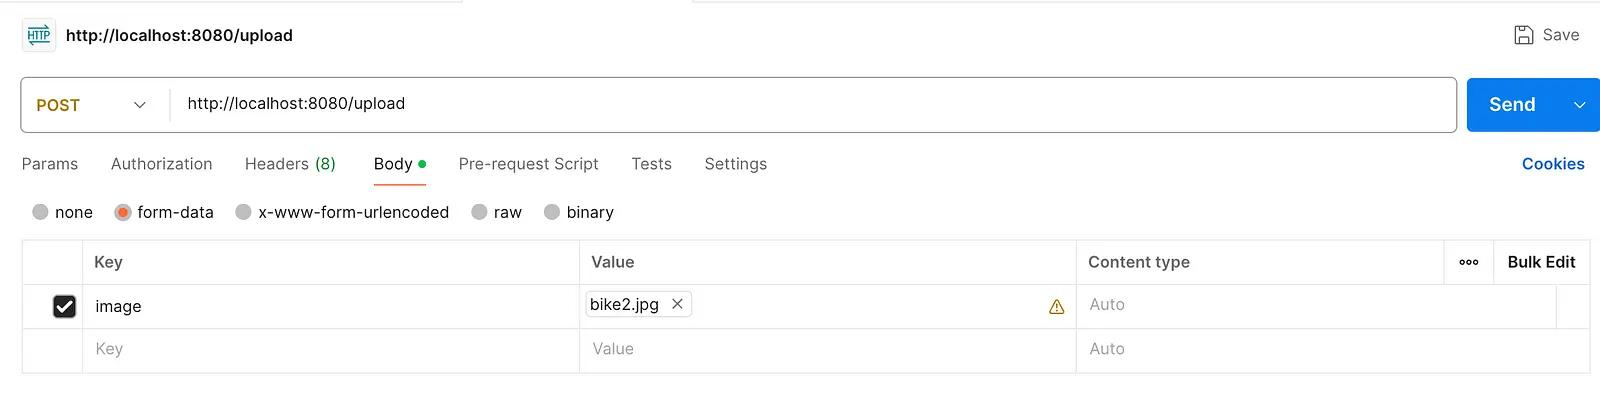
That should upload the image (in my example bike2.jpg) to our local S3 Bucket! You should see something similar to this in the console:
INFO  [com.tsv.service.S3Service] (executor-thread-2) Saving image in s3 bucket 's3-dev-bucket' ...
INFO  [com.tsv.UploadImageResource] (executor-thread-2) [bike2.jpg_dc8960c7-a304-4c39-a61d-090a198e8072]
Integration Tests with LocalStack and TestContainers
Alright, now to the main part. Before we continue, make sure to have the following test (and Jackson — serialization support for Quarkus REST) dependencies in your build.gradle:
    implementation 'io.quarkus:quarkus-rest-jackson'
    testImplementation "org.testcontainers:localstack"
    testImplementation 'io.quarkus:quarkus-junit5'
    testImplementation 'io.rest-assured:rest-assured'
To create an Integration Test for our application that saves images to an S3 Bucket, we should start a LocalStack container and create an S3 Bucket before we run our tests. Luckily, Quarkus provides a very nice way to spin up services before the application starts — QuarkusTestResource:
By simply annotating any test in the test suite with
@QuarkusTestResource, Quarkus will run the correspondingQuarkusTestResourceLifecycleManagerbefore any tests are run.
Let’s create our QuarkusTestResource in src/test/java that should start a LocalStack container and create an S3 Bucket.
package com.tsvetkov;

import io.quarkus.test.common.QuarkusTestResourceLifecycleManager;
import org.jboss.logging.Logger;
import org.testcontainers.containers.Container;
import org.testcontainers.containers.localstack.LocalStackContainer;
import org.testcontainers.utility.DockerImageName;

import java.io.IOException;
import java.util.Map;
import static org.testcontainers.containers.localstack.LocalStackContainer.Service.S3;

public class LocalStackS3TestResource implements QuarkusTestResourceLifecycleManager {
    private static final Logger LOG = Logger.getLogger(LocalStackS3TestResource.class);

    private LocalStackContainer localStackContainer;
    private static final String BUCKET_NAME = "s3-dev-bucket";

    @Override
    public Map<String, String> start() {
        localStackContainer = new LocalStackContainer(DockerImageName.parse("localstack/localstack:3.7.2"))
                .withServices(S3);
        localStackContainer.start();

        return Map.of();
    }

    private void createBucket() {
        try {
            localStackContainer.execInContainer("awslocal", "s3api", "create-bucket", "--bucket", BUCKET_NAME);
            Container.ExecResult s3BucketsList = localStackContainer.execInContainer("awslocal", "s3api", "list-buckets");
            assert s3BucketsList.getStdout().contains("\"Name\": \"test-bucket\"");
            LOG.info("Successfully created a bucket with name 'test-bucket'");

        } catch (IOException | InterruptedException e) {
            throw new RuntimeException("Something went wrong while executing awslocal CLI commands in the localstack container", e);
        }
    }

    @Override
    public void stop() {
        localStackContainer.stop();
    }
}
So what happens here — we create a Java class that implements the QuarkusTestResourceLifecycleManager
and need to implement the start() and stop() methods. In the start method — we create a LocalStack container with S3 service and start it! Additionally,
we connect to the container and execute some awslocal commands that help us create an S3 Bucket. I find this code easy to read and understand,
so I’m not going to go into any more details here. Still, if you have any questions regarding this piece — write me a message and I’ll be happy to help!
Now to the actual test — let’s create an Integration Test in the /src/test/java package and add this code there:
package com.tsvetkov;

import io.quarkus.test.common.QuarkusTestResource;
import io.quarkus.test.junit.QuarkusTest;
import io.restassured.common.mapper.TypeRef;
import org.jboss.logging.Logger;
import org.junit.jupiter.api.Test;
import org.junit.jupiter.api.TestInstance;

import java.io.File;
import java.net.URISyntaxException;
import java.net.URL;
import java.util.List;
import static io.restassured.RestAssured.given;
import static org.junit.jupiter.api.Assertions.*;

@QuarkusTest
@QuarkusTestResource(value = LocalStackS3TestResource.class)
@TestInstance(TestInstance.Lifecycle.PER_CLASS)
public class IntegrationTest {
    private static final Logger LOG = Logger.getLogger(IntegrationTest.class);

    @Test
    public void saveImageToS3Bucket() {
        File image = readImage();

        List<String> savedImages = given()
                .multiPart("image", image)
                .when().post("/upload")
                .then()
                .statusCode(200)
                .extract().body().as(new TypeRef<>() {
                });

        assertEquals(1, savedImages.size());
        assertTrue(savedImages.getFirst().startsWith("bike2.jpg"));
    }

    private File readImage() {
        URL imagefileUrl = getClass().getClassLoader().getResource("bike2.jpg");
        assertNotNull(imagefileUrl);
        try {
            return new File(imagefileUrl.toURI());
        } catch (URISyntaxException e) {
            LOG.error("String could not be parsed as a URI reference", e);
            throw new RuntimeException(e);
        }
    }
}
Here, we first read an image from our /src/test/resources folder (in my case bike2.jpg) so make sure you have at least one image there!
Then we use RestAssured, which is a great library for REST API Testing, to send a Post request containing our image file.
We then have some assertions, which you can expand or adjust to your own use cases! And there we go:

Conclusion
I really hope you enjoyed this one, as I have tried to get into as many details as possible and make the article beginner-friendly too! Many developers can confirm that the topic from today (although simplified in the spirit of the tutorial) is actually a very common real-life scenario. Saving files in AWS S3 Buckets and integration tests with Testcontainers are a part of the technical stack of many companies and I hope that being able to play around with AWS Services locally can remove some of the stigma (and cost fear) that stops many developers from experimenting with this.