you can also read this article in Medium -> click here
I’ve followed the YOLO models for quite some time now, and hearing that newer models remove the need for NMS (Non-Maximum Suppression) is something that I really liked. This is one less annoying post-processing step. Reading and drawing the results of the object detection is beginning to look very easy now. I have usually played around with YOLO object detection with Java using the OpenCVs DNN Module, but this time I decided to drop this (very) heavy dependency and use only the onnxruntime instead. You can have a look at some of my articles that cover the OpenCV approach, which is still very legit and many people actually prefer it:
- YOLOv11 Instance Segmentation with OpenCV and Java (Part 1)
- YOLOv11 Instance Segmentation with OpenCV and Java (Part 2)
- YOLOv11 Instance Segmentation with OpenCV and Java (Part 3)
- YOLOv12 Object Detection with OpenCV and Java
Before we go to the interesting part, let’s first get the basics straight
What are we really doing here? Obviously, YOLO is the object detection method, but what is ONNX? Simply said, in our context here, it provides a standardized format for exporting models trained in Python and running them inside Java. The onnx runtime itself is written in C++, but bringing in the onnxruntime dependency in our project brings us the Java classes we need to operate the inference and the actual native library for your operating system.
The YOLOv26 ONNX model itself, or any object detection model, cannot look at an image as a whole, it needs it as numbers, and specifically, a long list of numbers in the following form: first all the red values, then all the green values, then all the blue values, and each is squeezed between 0 and 1 (not the familiar 0–255 RGB color range). Remember this, this is important. We pass these numbers to the ONNX Runtime, which runs the heavy math in fast C++ code under the hood, but we call it from plain Java like any other library. The model then answers with yet another list of numbers, where it thinks the objects are, along with bounding box information and confidence values (how sure it is about a particular detection).
Hope this clears things up a bit before we dive into the code.
Get our YOLOv26 Model in ONNX format
Luckily, the conversion of a YOLO Model to .onnx is very simple. You can do it with the YOLO CLI or with Python. We’ll use the YOLOv26 model, which is the latest version available at the time of writing. I recommend using Python through Google Colab for this. Just create a new notebook and add the following code cell:
from ultralytics import YOLO
model = YOLO("yolo26n.pt")
success = model.export(format="onnx")
Run the code from above, and after this, just download the yolo26n.onnx model and save it to your resources folder in the Java project.
Prepare the image
Let’s start with something simple here. We’ll just load our image and visualize it. Here is our starting code:
private static final String IMAGE_NAME = "vase.jpg";

void main () throws Exception {
    var imagePath = Main.class.getClassLoader().getResource( IMAGE_NAME ).getPath();
    var originalImage = ImageIO.read(new File(imagePath));
    show(originalImage);
}
private static void show(BufferedImage img) {
    SwingUtilities.invokeLater(() -> {
        JFrame f = new JFrame();
        f.add(new JLabel(new ImageIcon(img)));
        f.pack();
        f.setVisible(true);
    });
}
Resize the image to 640x640
Now, let’s resize it to the size needed by this model (640x640):
var image = resize(originalImage, 640, 640);here also the minimal resize method:
private static BufferedImage resize(BufferedImage src, int width, int height) {
    var dst = new BufferedImage(width, height, BufferedImage.TYPE_INT_RGB);
    var g = dst.createGraphics();
    g.drawImage(src, 0, 0, width, height, null);
    g.dispose();
    return dst;
}
Convert the image to CHW
Remember from our basics we mentioned that we need the image in the following form:
a long list of numbers: first all the red values, then all the green values, then all the blue values, and each are squeezed between 0 and 1, (not the familiar 0–255 RGB color range)
The BufferedImage image object we currently have is essentially a grid of pixels. Each pixel has 3 color values: R-Red, G-Green, B-Blue. These values are integers in the range 0–255.
But, as already mentioned, our model is trained to expect its input differently. It wants all the red values in row-by-row order first, then all the green and then all the blue values in the same order. So the format we need is a one-dimensional float array like this:
[R1, R2, ... Rn, G1, G2, ... Gn, B1, B2, ... Bn]
  Red values      Green values     Blue values
Also, it expects its values to be from 0.0 to 1.0, so we need to divide each value by 255 to normalize it.
Now that we understand what needs to be done, here's how to code this cleanly:
private static float[] toCHWArray(BufferedImage img) {
    int w = img.getWidth();
    int h = img.getHeight();
    var raster = img.getRaster();

    float[] chw = new float[3 * h * w];
    int i = 0;
    for (int channel = 0; channel < 3; channel++) {    // 0 = red, 1 = green, 2 = blue
        for (int y = 0; y < h; y++) {
            for (int x = 0; x < w; x++) {
                chw[i++] = raster.getSample(x, y, channel) / 255f;
            }
        }
    }
    return chw;
}
and the next line in our main method becomes:
float [] inputData = toCHWArray(image);OK, let’s now get to the interesting part.
Load the model and run the inference
We need to add the onnxruntime to our dependencies. I have a Gradle project so in my build.gradle:
implementation 'com.microsoft.onnxruntime:onnxruntime:1.30.0'Now, in our code, we need to boot up the ONNX Runtime and load the model file. We can also check how the model input is called
try (OrtEnvironment env = OrtEnvironment.getEnvironment();
     OrtSession session = env.createSession(modelPath,
                                         new OrtSession.SessionOptions())) {

    System.out.println(session.getInputNames().iterator().next());
}
This prints “images” which is the model input name.
Our main method looks like this up to this point:
private static final String IMAGE_NAME = "vase.jpg";
private static final String MODEL_NAME = "yolo26n.onnx";

void main () throws Exception {
    var imagePath = Main.class.getClassLoader().getResource( IMAGE_NAME ).getPath();
    var modelPath = Main.class.getClassLoader().getResource( MODEL_NAME ).getPath();
    var originalImage = ImageIO.read(new File(imagePath));
    var image = resize(originalImage, 640, 640);
    float [] inputData = toCHWArray(image);
    try (OrtEnvironment env = OrtEnvironment.getEnvironment();
         OrtSession session = env.createSession(modelPath, new OrtSession.SessionOptions())) {
        System.out.println(session.getInputNames().iterator().next());
        // here we'll run the inference and draw the results
    }
    show(image);
}
Now we need to tell the onnx runtime how to interpret our inputData float array. It needs it in the form of a “Tensor”, specifically a OnnxTensor object, which is our float array without changing its data in any way, along with a shape that tells the onnx runtime how to interpret it.
// The shape the model expects: [batch=1, channels=3, height=640, width=640]
long[] shape = {1, 3, IMG_SIZE, IMG_SIZE};
OnnxTensor inputTensor = OnnxTensor.createTensor(env, FloatBuffer.wrap(inputData), shape);
It’s important to note here that our float array data doesn’t change. We’re just saying what our data represents, something like this:
Here are my numbers, and they represent 1 image, with 3 color channels, 640 pixels high and 640 pixels wide.
Now, we run our inference!
OrtSession.Result result = session.run(Collections.singletonMap(inputName, inputTensor));The YOLOv26 result here is a fixed-size output in the following shape:
300 rows, 6 numbers per row.
Each row is contains the bounding box, confidence value, and a class ID:
[x1, y1, x2, y2, confidence, classId]
And we don’t need NMS (Non-Maximum Suppression)!
Sometimes the models detect the same object multiple times with slightly different, partly overlapping bounding boxes. NMS removes these “duplicates” and keeps the one best detection for an object. Our YOLOv26 model handles this directly, and we don’t have to do it ourselves!
It’s actually nice to inspect the result ourselves; let’s just print it out to confirm what we discussed earlier:
System.out.println(result.get(0));This should print something like this:
OnnxTensor(info=TensorInfo(javaType=FLOAT,onnxType=ONNX_TENSOR_ELEMENT_DATA_TYPE_FLOAT,shape=[1, 300, 6]),closed=false)
You see the shape here yourself [1, 300, 6], where the 1 in the beginning is just the batch dimension, and we can drop it. Let us do this real quick:
float[][][] output = (float[][][]) result.get(0).getValue(); // shape=[1, 300, 6]
float[][] detections = output[0]; // drop the batch dimension -> 300 rows of 6 numbers
These detections contain all the information we need to draw the bounding boxes on our image.
Draw the detected bounding boxes on the image
So let’s implement the following method:
drawDetectionsOnImage(image, detections);We’ll use Java2D API for this. The code is quite simple:
private static void drawDetectionsOnImage(BufferedImage image, float [][] detections) {
    Graphics2D g = image.createGraphics();
    g.setColor(Color.WHITE);
    g.setStroke(new BasicStroke(2));
    g.setFont(new Font("Arial", Font.BOLD, 16));

    // Draw every row whose confidence clears our threshold.
    for (float[] row : detections) {
        float confidence = row[4];
        int classId = Math.round(row[5]);
        String className = classNames[classId];
        if (confidence < CONF_THRESHOLD) continue;
        int x1 = Math.round(row[0]);
        int y1 = Math.round(row[1]);
        int x2 = Math.round(row[2]);
        int y2 = Math.round(row[3]);
        int width = x2 - x1;
        int height = y2 - y1;
        // Bounding box
        g.drawRect(x1, y1, width, height);
        // Label + Confidence in %
        String label = className + " " + String.format("%.02f",(confidence * 100)) + "%";
        g.drawString(label, x1, Math.max(20, y1 - 5));
    }
}
And that’s it! Before running this, don’t forget to add the following constants at the top of the class — the COCO dataset class names:
private static final String[] classNames = {
        "person", "bicycle", "car", "motorcycle", "airplane",
        "bus", "train", "truck", "boat", "traffic light",
        "fire hydrant", "stop sign", "parking meter", "bench",
        "bird", "cat", "dog", "horse", "sheep",
        "cow", "elephant", "bear", "zebra", "giraffe",
        "backpack", "umbrella", "handbag", "tie", "suitcase",
        "frisbee", "skis", "snowboard", "sports ball", "kite",
        "baseball bat", "baseball glove", "skateboard", "surfboard",
        "tennis racket", "bottle", "wine glass", "cup", "fork",
        "knife", "spoon", "bowl", "banana", "apple",
        "sandwich", "orange", "broccoli", "carrot", "hot dog",
        "pizza", "donut", "cake", "chair", "couch",
        "potted plant", "bed", "dining table", "toilet", "tv",
        "laptop", "mouse", "remote", "keyboard", "cell phone",
        "microwave", "oven", "toaster", "sink", "refrigerator",
        "book", "clock", "vase", "scissors", "teddy bear",
        "hair drier", "toothbrush"
};
and the confidence threshold:
private static final float CONF_THRESHOLD = 0.8f;You can experiment with different values here to maybe also see results with lower confidence scores.
To stitch everything together one more time, your main method should have the following structure in the end:
void main () throws Exception {
    var imagePath = Main.class.getClassLoader().getResource( IMAGE_NAME ).getPath();
    var modelPath = Main.class.getClassLoader().getResource( MODEL_NAME ).getPath();

    var originalImage = ImageIO.read(new File(imagePath));
    var image = resize(originalImage, IMG_SIZE, IMG_SIZE);

    float [] inputData = toCHWArray(image);

    try (OrtEnvironment env = OrtEnvironment.getEnvironment();
         OrtSession session = env.createSession(modelPath, new OrtSession.SessionOptions())) {

        String inputName = session.getInputNames().iterator().next();
        // The shape the model expects: [batch=1, channels=3, height=640, width=640]
        long[] shape = {1, 3, IMG_SIZE, IMG_SIZE};
        OnnxTensor inputTensor = OnnxTensor.createTensor(env, FloatBuffer.wrap(inputData), shape);

        OrtSession.Result result = session.run(Collections.singletonMap(inputName, inputTensor));

        float[][][] output = (float[][][]) result.get(0).getValue(); // shape=[1, 300, 6]
        float[][] detections = output[0]; // drop the batch dimension -> 300 rows of 6 numbers

        drawDetectionsOnImage(image, detections);
    }
    show(image);
}
I really like the simplicity of this method here. Once we understand the basics, the whole thing gets pretty easy.
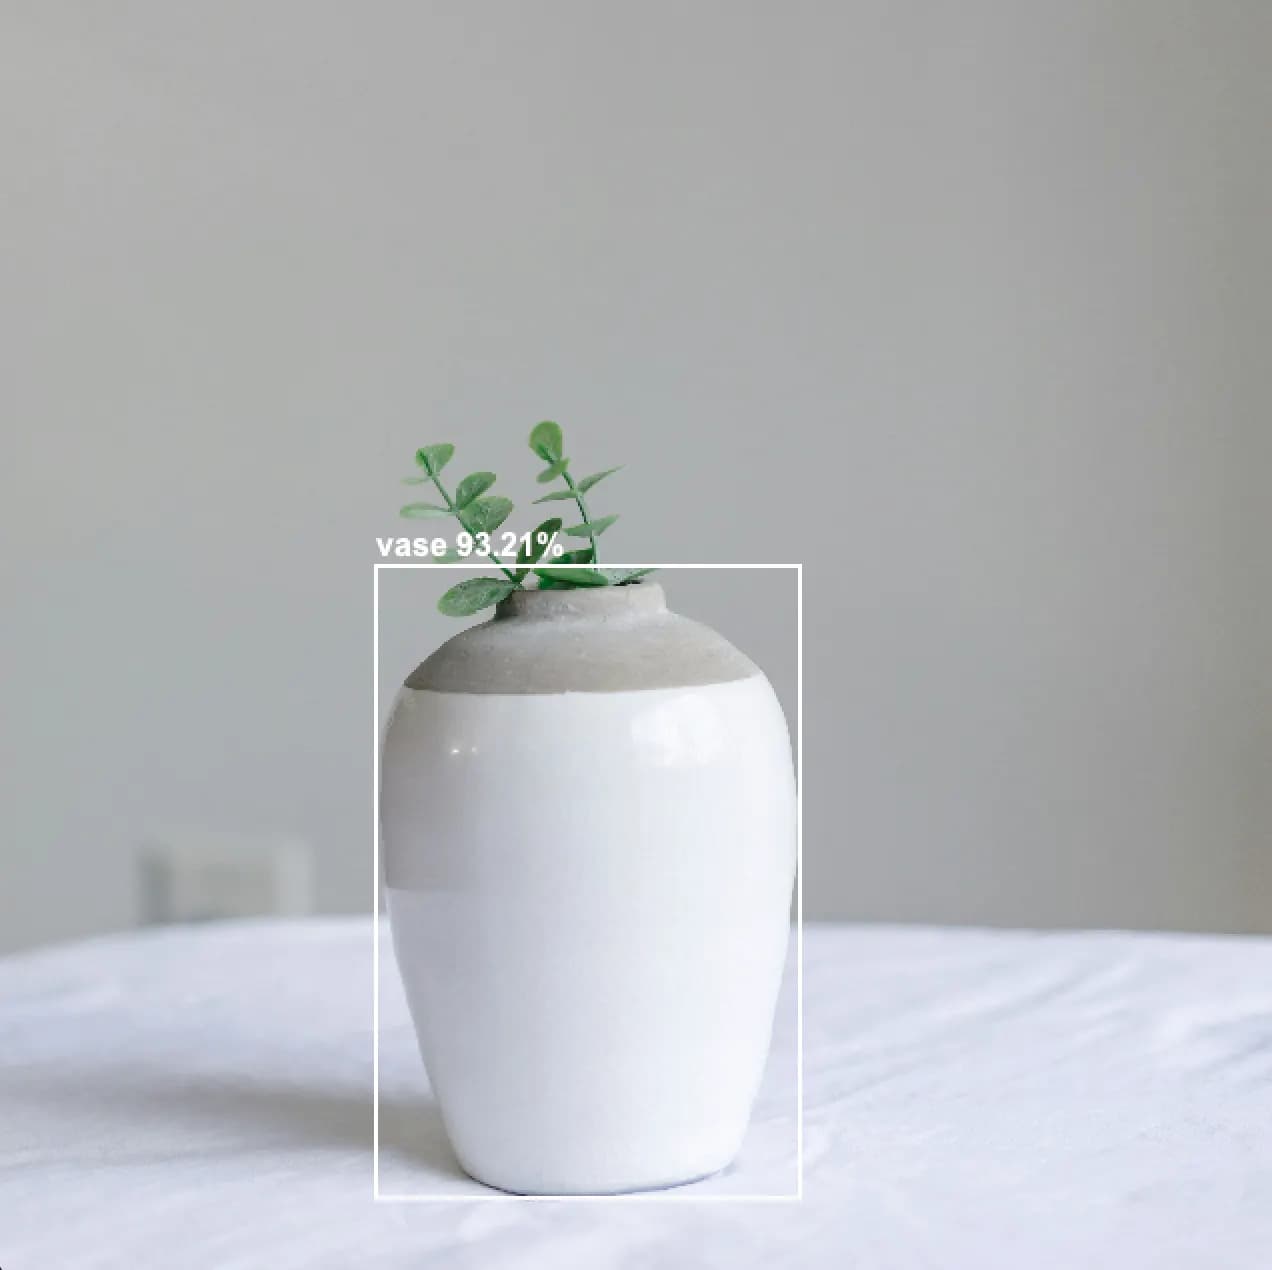
Now let’s run this! Here is my result:
Conclusion
Hopefully, this helped you understand some basic concepts and technologies for object detection in Java. The process seems not exactly straightforward at first, but I hope we managed to tackle all the tricky parts in detail. If you have any questions, I’ll be happy to help!
Thanks for reading!